I know this is like the 4th or 5th shot of the Bridgers...but the clouds have been soooo epic it just needed to happen. I was just getting out of class, and I happened to look out at the mountains. The clouds were just hanging in an inversion layer half way up the slopes. It was amazing looking, I had to capture it.
But I knew I should do something a little different. So instead of doing another b/w, I did a panoramic in color today. It was early in the morning, so the sun was just beginning to peak through the clouds and shine on the peaks. The overall tone was very flat and someone bleb, and in an attempt to correct that a bit I shot bracketed sequences to make HDR later. This would hopefully add some colors back as well as contrast that I was wishing for.
Some other things I changed, I shot wider to include more of the foreground and make the photo more about the landscape in general rather than just the mountains. I also shot from a tripod, so everything was nice and level, easy to composite later.
I shot at f10, ISO100, 1/125. Nothing special. Just what worked at f10.
For editing, I went straight to Photomatix Pro, and batch processed the photo using my "mountains" preset, which I made for this photo. It is essentially a tonal compressor, meaning it just takes the complete tonal range of the scene that was captured in three shots, and compresses it into one photo. I modified it a little to have more mid tone contrast. I wanted the photo to look fairly natural, not too over processed like I do a lot. Not that over processing is bad, I just wanted something different tonight.
In Lr, all I did was lower the whites a bit, and then add some clarity to the mountains. Pretty simple. Again, I wanted to make it fairly natural.
It was another stormy day in Bozeman today, and I somehow ended up on the same stretch of road I did last night. Funny how that works....
The mountains still looked amazing though, so why not shoot them again?
This time, the cloud cover was complete, and they were low enough to be rolling over the mountains. Really epic. I shot the same way I did yesterday, hand held panorama, only this time I shot vertically to get more of the ground and the sky in the frame. There was this huge cow gathering, and I wanted to include them. It was also a bit darker today, so I shot at 1/100 f8 and ISO250. That's about 3 stops darker than yesterday if I remember right. Maybe...
Editing followed a lot of the same lines in Lr. Also entirely actually. Clarity, shadows and highlights up. I also did some curves adjustments in Ps. I think four layers of it actually. First one was just to bright up one cow in the foreground. Next one was to lighten the ground up a tad. Third one added more contrast to the mountains, and the fourth added to the sky. I did all this by using layer masks to select where I wanted each adjustment to go.
I don't feel like I need to say much about this photo since it's so similar to yesterday! But even though it is, it still has such a different feel to it. Much more menacing and dark.
It was stormy this afternoon. It almost rained on me coming home from work, but amazingly it cleared up in the evening. I was driving on the outskirts of Bozeman, and happened to look over at the Bridgers. What a view. The rain earlier in the day had cleared the air, so there was almost no haze at all to mask the Bridgers. The contrast on the mountains was epic, so flatness or blandness to them at all. You could almost see the individual trees on the mountains. To make it better, they were dappled with light from the dramatic clouds looming over the peaks.
I only with I only remembered my polarizer. With a polarizer, I could have darkened the sky and but out even more of the haze (not that there was much). As it were without a polarizer, the sky stayed pretty light and blended in with the clouds more than I would have liked. But with editing I fixed that to some degree, so it worked out in the end. It just would have been much nicer to be able to do the effect in camera rather than in post. Any edit you do in post just degrades the photo, so doing what ever you can optically helps a lot.
For shooting, I was at f11, 1/200, and ISO100. I wanted everything to do be very sharp, so I shot at f11. The sharpest part of a lens is in the middle of the aperture range, even though you get more depth of field with smaller apertures. The rest of the settings just followed to get correct exposure.
To get the whole range in the view, I could either do one wide frame and crop it, or I could take a series and stitch them. I knew I wanted to do a panoramic, but I did not just wanted to crop a wide photo. I didn't have time to set up my tripod, so I just zoomed in a bit and hoped I was shooting level. If you don't use a tripod when taking a pano, you tend to float up or down, and your pano get skewed.
Which is what happened. But that was an easy fix by just warping the image a bit in Ps to make it level again. Cheating technically and it distorts the photo, but not enough to really notice.
But before I did the pano, I did my editing in Lr. For each photo, I applied the same edits. B/w conversion first off, as well as upping the clarity and whites a bit as well. Shadows then went up to preserve shadows details. The point of these edits was to enhance the contrast and make the image more dramatic and true to the way I remember seeing it. As I've said before, the point of photography sometimes is to show the world how you see something, no always just how it looked in reality. If that means making it untrue to life, but true to yourself, then you should do it.
To correct and make the effect a polarizer would do, I lowered the luminosity of all the blue spectrum colors. So blue, violet, purple, etc. This darkened the sky a lot, and make the clouds stand out more. Just right.
Heres the non polarized version and the final version so you can see the difference it makes.
I spent most of the evening in the VCB developing film, writing essays, and then scanning negatives. So when I finally got home an hour ago, I definitely didn't forget that I hadn't done a photo for today. But I remembered just before I got into bed, so never fear! There is a photo.
Don't ask me the thought process behind thinking of this photo, but I came up with the idea of dreams and not being able to open a closed door. Super random. To visualize this, I planned to use a shadow of my hand reaching toward the doorknob.
That sort of happened.
First, I got an exposure down for cutting out all ambient light. 1/250, f7.1, and ISO100. I probably could have gotten away with just using 1/200 and f3.5, but I wanted a sharper photo. With that f stop, I had to use 1/32 on the strobe with a grid to focus the light a little bit. If I didn't have a grid, then everything would be evenly lit, and looks boringgggg.
It took a while to get the right hand shadow thing. I eventually put the light on a stand to steady it up, but I went through a lot of photos before I got a good one.
For composition, I just threw everything out of the window. Knob right in the middle on the very far left. Not where it's suppose to, but I like it so what can you do? Sometimes just break the rules!
Editing was simple really, I lowered the clarity a lot to keep everything smooth, as well as raising the noise reduction up to get it even softer. I then lowered the highlights and raised the whites a bit to knock down the big bright spots in the upper left of the image.
So apparently the largest, or one of the largest, copper mines in the world is in Butte. Just an hour or so away from Bozeman. It supplied most the world with the copper it needed. Most of the world....or so I am told. It used the be a system of tunnels, hundreds of miles long. But they started filling in with water, so they just tore everything up and made it an open pit mine. Cue erosion.
Which makes really cool photos from a distance. Today, my photo class visited Butte to do architectural photo stuff with 4x5 cameras. Before we started off, we visited an overlook of the mine. From where we were, you could see this crazy patch of erosion. It looked basically like I was looking straight down on it or something, so it became this really cool texture patch.
I shot at f7.1, ISO100, and 1/500. Nothing special to report there.
I did try to get nothing but the hill side in the photo, and to put the biggest erosion line just off center, not in the middle. There's a reason the Rule of Thirds is a rule...
For editing, I cropped a bit to get rid of a tree, and then I converted to b/w. There's something about b/w that is really pleasing for textures. Especially when you then up the clarity and highlights. Make it super contrasty.
That's about all for this photo. It's not a terribly complicated one, but it is interesting all the same.
As I was taking some mega awesome fall leaf color awesome rad photos in the backyard, I spied this little rabbit that was hanging out back there. It didn't seem to scared of me, so I quietly slipped back inside to get my tele lens. I only had my 50mm on at the time, and that's no sufficient.
I then proceeded to stalk the rabbit around the yard. I army crawled from the backdoor across the yard to get closer to the rabbit without scaring it. Luckily, it didn't give a flying carrot about me, it just happily munched away at the grass. It must be so used to human....
Anyway, there I was, stalking a rabbit. I was fully telephoto at 300mm, actually 480mm on my crop sensor 7D, and shooting in Av mode. I had my ISO at 500, f7.1, and the shutter was coming out to 1/40. Normally, with out stabilization, the image would be super, super blurry. Like totally unusable. But with stabilization, I got some pretty usable photos. Some were blurry, but I shot enough that there were some okay ones.
For framing, I just tried to get the head in the upper right third. Looking back, maybe including the ear would be nicer, but I think it's okay.
Editing was simple and complex at the same time. I first upped the clarity and contrast in Lr, as well as covering to b/w. Then I went into Ps and played around with some filters. I settled on one that was called rough pastel. This essentially blurred the image in a precise way, following the edges already in place. It created a really interesting effect, almost a soft glow kind of blur. I loved it. Except for around the eye. So I made two versions of the image, one with the blur and one without. Then I made a layer mask on the blurred version, which was on top of the original, and let the original eye go through.
Back in Lr, I upped the clarity a bit more, bad bad I know, reduced noise a bit, and added a vignette. Actually, a lot of vignette. I just love them on these kinds of photos. I also adjusted the tone curve a bit to darken the shadow/blacks a bit, and then lighten the whites just a hair. No pun intended.
It's my schools slogan, so I suppose it's an appropriate title...
I wanted to do another double exposure tonight, but this time actually do something a bit more complicated than a hand and a spoon. So I tried with people....didn't work out really like I hoped.
To set up the shot, I had two strobe outside my window shooting in. They were at 1/4 power and I was at f5.6, so there was a whole lot of power getting to the camera. I put Nick in front of the blinds of the window, then took a couple pictures of him in profile. My plan was to then put a face on the side of his head or something. I thought it might look cool, yeah?
With this lighting set up, the background around Nick was completely blown out, but he was still in shadow. Perfect for putting something in the outline of him using the lighten or screen blending mode.
I then took the lights in side, and did a couple photos with Alex cross lit. The strobes were to the sides of him and slightly to the back. This made some great backlighting, and made for a dramatic photo. The camera settings were the same, but I put the stones at 1/32 power.
In Lr, I upped the clarity, highlights and shadows on the photos to get more drama out of them. They didn't turn out to be bad photos in themselves.
Once I got to Ps, things started going wonky... first the Alex photo didn't really fit in with Nick at all. It just wasn't going to work. You can tell when a photo is fighting you, and so I didn't push it.
So now that I have this blank canvas, what to put in it?
How about some dramatic clouds and landscapes. Those always fit into things. So I grabbed a couple images I've shot lately and threw them in. The hill picture from a couple days ago went in on his shoulders and neck, ending just at the jaw line. This just provided a really cool texture I think, and led into the next photo well. The photo that I took from the side of the road when I first got back to Montana was put in over his face. I took the really dramatic clouds, as well as the mountains, so just a small piece. To blend everything together, I used really soft brushes on layer masks to feather the edges of the photos. It looks like the grass just leads into a fog layer at the base of the mountains, and then into an epic sky. Not too bad, but could be better I think...
My photos seem to have a food theme lately...quite a few of them at least.
Tonight I wanted to play around with "multiple exposures" a bit. They aren't true multi exposure because they are not done in camera, but then again with digital what does in camera mean? As soon as the camera reads the light on the sensor, it's being manipulated, so I guess it could be argued that doing layering in Ps is like doing multiple exposures.
I should probably explain multi expos a bit. They are when you combine two or more images into one frame. Traditionally, they are done by making two exposure on the same frame of film, or enlarging two images on one sheet of paper in the dark room.
When combining images, it's all about getting the right exposure. Together, the images have to equal correct exposure. So if they're two images, each would have to provide 50% of image data, or 60/40, etc. The more images there are, the more under exposed each has to bed. That being said, each part of each image will have different areas of light and dark. A window will be brighter than the surrounding room for example. When you combine images, if you have two bright areas over top of each other, it's going to blow out that part of the image. Same goes for two very dark areas, they're going to come out still dark. So you have to think about how much you are going to under expose each image as well as how the images are lined up with each other.
Luckily, in digital land you really don't have to worry too much about that. Everything can be manipulated later.
Tonight, I just wanted to try something basic and easy to make sure I got the hang of it.
I started out by shooting my hand in front of the computer screen. My hand is very underexposed, and the screen is very bright. This leaves an area of low image data to put something in, and a bright area that I don't have to worry about messing with. In Lr, I bumped the contrast up a lot to really make darks black and the monitor as bright as I could. In Ps, I even cut out the hand and filled the monitor in with complete white.
The next image was of a spoon thing. I under lit it under my desk with my Maglit. I pointed the light strait up, then just caught the light in the spoon and shot away. This made the background very dark compared to the spoon thing, which worked out great for laying.
In Ps, I used the lighten blending mode to composite everything. The light areas of the spoon photo, which was only the spoon, showed through the darker areas of the hand photo. I positioned the spoon just inside the hand, as if to say that hand are for one purpose. Eating food. Which is really what they are for, right?
I didn't do much in Lr after that, just convert to b/w and that's it.
This was really a test photo that turned out pretty cool. I'll probably experiment with this more often, maybe with some portraits or something.
As I was sitting (well, watching Top Gear and eating raisins), and thinking about what photo I was going to do tonight, I decided I wanted tea. So I walked out to the kitchen, and got some tea.
It was delicious.
I also saw a stair case that was really cool. And I had an idea.
So, stay with me....a shadows hand chasing someone up the staircase. B/w probably, with a grungy feel.
First things first, got to set up the tripod. I wanted a low angle with a wide lens to make the staircase feel large a menacing. This also worked out well because the wall would be in a perfect spot to put a shadow on.
For the shadows, I put a grid on my strove, stuck it on a light stand, and then just fired away with my hand in various positions in front of the flash. Looking at the picture, I think I could have had my hand coming from lower down, and everything turned a bit more so that you can see it's actually a hand...but oh well, I still like the results.
oh and I shot at 1/25 f3.5 and ISO100 to get some ambient light in there. I wanted sort of a glow going on from the bottom of the stair way. Not enough to eliminate much, but add and little something.
Next, I needed me in the photo at the top of the stairs. I played around with lighting for a bit, different angles and what not, but I found my very first try worked the best. I simply took the light from the bottom of the stair and brought it up to the landing and pointed at me. It actually lit up the wall, but with black pants I made a nice silhouette. Perfect.
Now with these two shots, I needed to combine then in Ps. Simple layer masks did the trick, just used a big soft brush to paint me in, then used a smaller brush to clean up around the stairs so that I wasn't fading into the other picture.
Back in Lr, I upped the clarity just a hair, and then shot the highlights way up there. Lots of contrast in this one. Then I even added some grain to it....I know...insane right? Looks almost light a really crappy print from PHOT135 I would have made last year! Terrific!
I think I have found my new favorite food, well maybe second favorite food after bananas. Still...I might have to have this food item for breakfast tomorrow because it is so yummy. So, so yummy. It's so good, I am actually saving it for later. I never, ever, ever do that with food. If I like it, it disappears. Unless it's so good it doesn't deserve to be eaten right away. It must be savored, saved, appreciated.
Hold on, I've got to go eat something real quick...
So, humus. Humus is delicious. With rice crackers, it's definitely my new favorite snack. I got some Sabra humus and rice crackers tonight (obviously), and thought they'd be good for a picture. As it turned out, they made a great product picture, and then an amazing snack afterword.
I set up the shot in the light box thing. One strobe at 1/8 pointed behind the humus, and one strobe also at 1/8 pointed up and away in front of the humus. I shot for a bit with just a white background, but I wasn't really feeling it. It was too...cold. The humus is a warm food, I mean it's cold, but it feels like a warm food. The package has warm colors on it, and the white was just too frigid.
We have some bamboo cutting boards, so I grabbed two of those and made a little mini backdrop. Perfect. The wood created a nice warm glow around the humus, and had some wonderful textures in it. I had to adjust the backlight so that it reflected off the white side of the light box instead of the wood. If it had been going off the wood, there would be too much of a reflection and hot spot on it.
I was shooting at 1/200, f6.3 and ISO100. The only real important setting there is the f6.3. This provided a bright enough scene without having to crank the power of the flashes too much, but also it had a nice depth of field to focus the viewer on what was important.
In editing, I upped the exposure on stop. This means I should have been shooting at ISO200 or cranked the power up on the strobes one stop. However, it could also just mean I was exposing for the shadows, and then developing for the highlights, like with analog photography. I'm not really sure how Lr adjusts exposure. Either way, I made it brighter in Lr. Then, I upped the whites and dropped the highlights just a bit to brighten the whites but not over blow them. I also upped the clarity a bit and the vibrance a lot. Colorssssssss.
and a little vignette.
For composition, I wanted the logo to be in the lower left, with the crackers on the right. Everything everything sort of points to the logo. There's still the little chip in the humus to temp you to just taste the humus. It's as if the picture is just ready to be eaten.
Tonights photo is very, very similar to yesterday's photo. The evening light tonight was lovely, and our backyard just glows in the late afternoon. I mean literally, it glows. The golden light from the sun bounces off the side of the house and it basically becomes a giant soft box or reflector.
One of the windows caught the sunlight and painted this little bright spot on the fence tonight. It was this one area of sharp light in a sea of soft light, so of course I had to do something with it. I grabbed Nick and made him crouch down to be in the light. His face was lit by a combination of the reflected light from the window, and the super glow coming from the house.
Something really interesting happened. It made an almost shadowless, but still contrasty lighting scheme. Nicks face almost looks flat, but there is still depth on the edges of his head. It's really really similar to what a ring light would do.
I shot in Av mode at f1.4. This got me a super, super shallow depth of field, just his eye's were in focus, and only just. This choice was really just me playing around to see how it would look. I'm not sure if I like it, it might have been nicer if there was a bit more sharpness and definition. But oh well.
I also shot landscape, which is odd for me and portraits. Again, just to change things up a bit. It just felt like a landscape kind of shot, the fence behind stayed very horizontal, just Nick just on one side. The light spot on the fence still hold some weight on one side, so the photo is still balanced.
As for editing, I used exactly the same settings as yesterday for a base. Then I tweaked things just a bit, added some blues to the shadows and a bit a clarity. But that's it really. Same editing as yesterday.
Don't have a ton of time today to write for the blog, typing is such a time consuming thing to do these days! But I made a short video explaining everything, just like the ones I've done in the past. It'll do the talking for me, and you don't have to read all my misspellings and grammar errors! Win win!
It was a dark and stormy evening in Bozeman...actually it was pleasantly warm, with dramatic skies and even more dramatic lighting. I was off hunting down a good location to shoot some of the mile long, yes mile long, sun beams coming out of the sky. Ending up on Peat's Hill, I got a couple good ones of the hills way west of here as they were struck by the rain and sun beams coming down.
But I didn't end up liking the pictures as much as I liked something else.
As I was walking back to the car, I looked behind me and saw the light hitting some hill sides with the dramatic blue skies behind it. I grabbed a quick shot and knew I loved it right away. It was totally my style of photo. Very 2D, just two layers and almost no really depth to it. The hills gently rolled their way through the frame as the dark sky looms behind them. I wish I would have had a red filter or maybe a polarizer on to make the sky a bit darker. As it was I had to do it in Lr, which doesn't really look all that great.
I shot at 1/80, f6.3 and ISO100. Nothing really special about these settings, just happened to be what worked and got a good exposure.
The first thing I did in editing was covert to b/w and then crop the bottom of the image down to make the hills fall on the lower third of the image. This makes a much more pleasing composition in my eyes, as it still is about the hills, but takes on the sky as well.
Looks pretty good just after that. There's some clarity, highlights and contrast adjustments as well at this point. Everything up a tad. I also raise the blacks end of the tonal curve to mute the blacks a bit. Just to make the hillside a little less contrasty at that end of the spectrum.
Next went on the local adjustments. I raised the clarity and contrast on the hill side, then lowered the exposure, raised the clarity and contrast in the sky. All that was really to add some pop to the picture, which I think really helped things.
The top image is with a brush to paint in the sky, and the lower was with a gradient filter. I like the top image more with the darker sky and lighter ground. There is more of a transition between the sky and the ground, but I don't think it's too noticeable. Maybe I'll change my mind about that though later.
I found this awesome rock the other day, I'm pretty sure there's a bunch of fossils in it. I call it a sandwich rock, totally not the correct term for it, but it looks like a sandwich to me. There a couple layers of sandstone, then a layer of gravely sediment in the middle with a bunch of little shells, leafs and other small organic matter. It's really really hard to see, but I swear they are there.
So why didn't I use a macro lens and shoot the rock with that? Because, reasons! No, I did have a reason. I wanted to get the whole rock, so you could see the layers in it, rather than just get the fossils. I might do a reshoot with a macro lens at some point, but I like how the photo turned out tonight.
I lit the photo with a ring light, which I think was the perfect choice. Simple, yet amazing. Shooting at f.8 and 1/32 on the strobe got me a really nice ratio. I didn't have to do any work to brighten things up or what in Ps. I did upped the clarity and highlights just a tad because I'm me, but that was about it. I love, love, the background and how the ring light affected it. You can see in the image what I'm talking about. Just draws the eye right to the center while still looking amazing.
As for editing, like I said, clarity and highlights a bit. I also did a little local adjustment to raise the clarity and highlights again just over the rock, and added a vignette around everything. Obviously, I converted to b/w, and the I added some blues to the shadows and just a snipped of yellows to the highlights. Add a little something something.
That's about it folks. Not much else to it. Ring lights work magic.
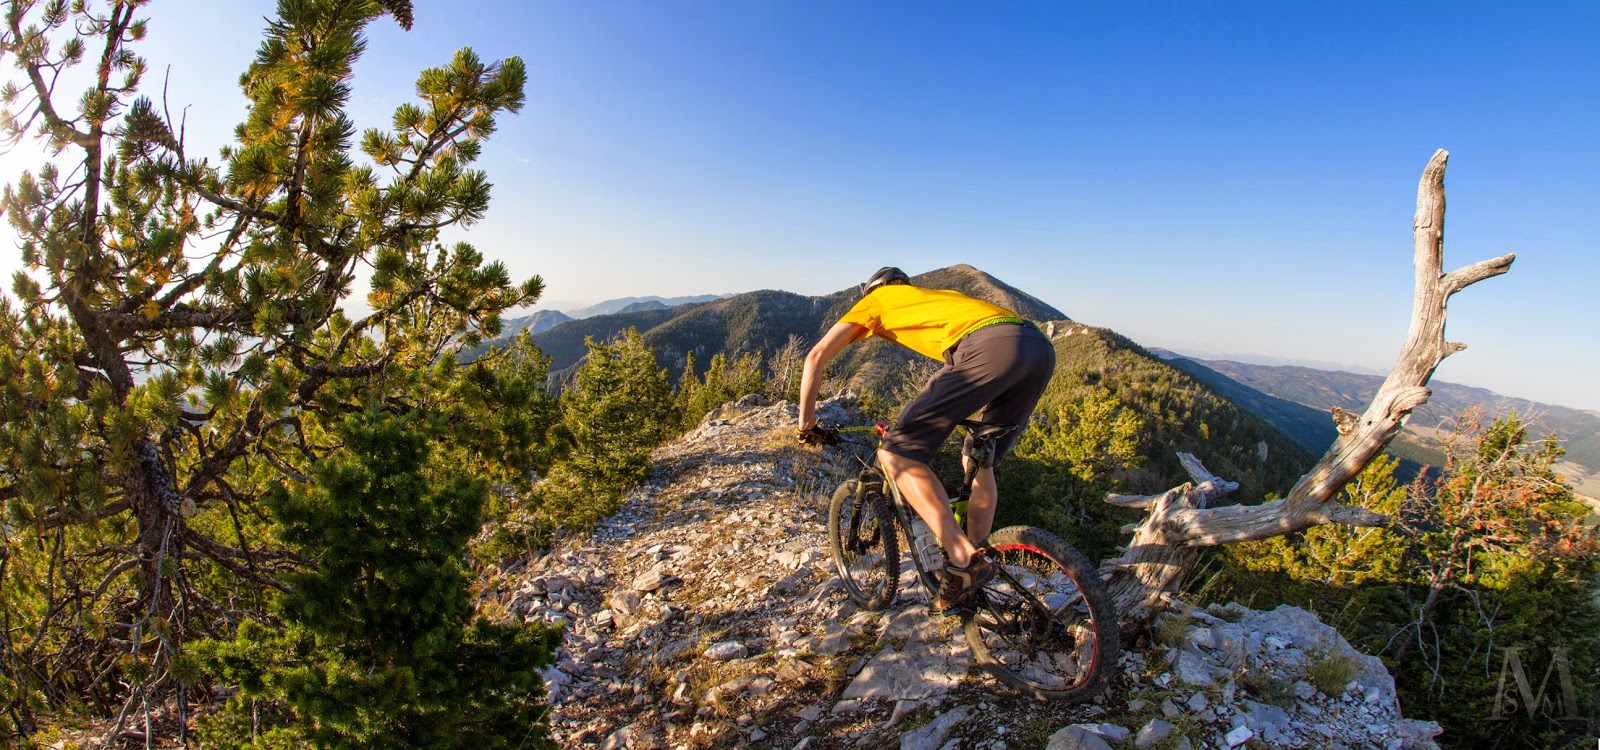
After a late night trying to see the aurora, I headed over to Discovery Bike Park to ride today. The park is about two hours from Bozeman, and only $28 for a day pass! Not bad at all, not bad at all. The trails are actually amazing, nothing huge, but super fun once you get warmed up. It was incredibly dry today, and so it was just drift and dusty everywhere.
And of course, I was riding with two cameras in my backpack. Sadly, my Nikon EM's battery died and so the shutter didn't really work on that....but my 7D was all charged up and ready to go!
I only brought my 50mm on the 7D up the lift, so that was kind of a limiter in that way, but no matter! Just makes you be more creative.
After shooting a few corners and jumps, Drew and I met up with the other guys we were riding with, and headed down the mountain. At one point we stopped on top of this hill so that one of the guys could point out a feature coming up. It was a step up to a giant hill side, nothing too big but it did launch you pretty high up. I had just enough time to rip, and I mean snatch, grab, quickly extract in a rapid fashion, my camera from the bag to catch Drew hitting it. From where I was I did have many angle to choose from, and no time anyway. I managed to catch him though, since I still had the same settings up from the last picture.
I was on drive mode at 1/1250 at f2.8 at ISO100. This was exposed for half way between the shadows and the "proper" exposure my camera was telling me. Just perusal preference on this really, just me wanting a brighter look.
As it was, I got really lucky with composition. The frame pretty much got divided into three layers. The shadows dark grass foreground, the dirt wall with Drew, then a layer of grass and the trees. It really leads your eye where the rider is. I just love it. It probably won't win an award, but whateverrrr.
For editing, I cropped it down a bit to turn it into a longer, skinny aspect ratio. Going along with the layers theme. Then I converted to b/w, upped the clarity, and whites. Just that. More pop with the clarity.
Hiked Baldy today. Perfect hiking day, warm, but not too warm. Nice breeze, but not too cold. Snow, but just enough to make the photos awesome. And quiet, almost nobody was hiking once I got above the M. I greatly recommend Baldy for hiking, it's a long, hard hike up, but the view is simply amazing, and all along the ridge there are great views as well. There's a couple thousand feet of evaluation gain (pretty much all in the first couple miles) but along the ridge there's some gorgeous gentle climbs up meadows and along ridges. The final hike up to the top is super steep, but there are fossils around everywhere! And when you get to the top, it's a complete 360 view. Simply amazing.
I luged three cameras up there today. My 7D, my Nikon EM (35mm film), and then a Toyo 4x5 camera for class. I don't have any of the pictures from the EM or the Toyo because I haven't developed them yet, but I can't wait to see the results. It was so much fun having three cameras to play with up top. Manipulating the focal plane on the Toyo is definitely my favorite thing about shooting 4x5. I got the ground in front of me in focus, as well as Bozeman which is a few miles away! I just love what you can do with those cameras! So worth luging it up there.
But now for the blog photo, shot with the 7D. I did one panoramic with a 10mm lens, but I felt the wide angle expanded the distance too much. To be able to really see anything of the valleys, I needed to get a little more zoom in, or blow up a print to the size of a wall. Since I didn't have a wall or print, I just put my 18-135 on a went to 30mm. This still got some of the foreground, but it compressed and brought the distance a little closer. It's much more the focus now than in the last panoramic. I'll post both so you can tell the difference.
Since I was doing a 360 degree pano, I need to be certain my trip was absolutely level. It it wasn't, I'd lose a lot of image in cropping. The resulting image would be pretty much like a wave, so to crop it and have no blank space you'd only get this tiny strip in the middle. No bueno.
I shot at ISO100, f13 (with a polarizer), 1/80 and 30mm. With about 50% overlap between frames so that it would play nice in compositing.
Before I did the pano in Ps, I did some basic edits on the photos. I upped the clarity, highlights, contrast and shadows a bit. I also converted them to b/w to get rid of the mute colors of the day. I just wasn't a fan of them. In the evening it would have been nice, but maybe next weekend when I don't have to get up early the next day.
Ps did and excellent job making the pano, and after cropping I went back into Lr. I did just some local adjustments to the two valleys to up the clarity. That's it. I just wanted more pop in those areas, and that's what clarity does.
There was supposed to be the northern lights tonight...
I didn't see any. Sad face.
But I did get an interesting shot out of the night!
Some of my co-workers at F-11 and I went out into (insert name of place I don't know) and just played with camera's for a couple of hours. It was a very bright moon tonight, so the landscape was just lit up like day light.
I started shooting at 30s, f2.8 and ISO500. Usually, I have to shoot at ISO800 or 1600 to get any decent shot at night, but it was just so bright tonight!
But I soon got somewhat board of just taking those shots, so I tried something I've never tried before. At least digitally like this. A double exposure. Not a true double exposure, but essentially the same thing.
It took some experimenting to get the right blend, but I settled on shooting one scene for 25 seconds out of the 30s exposure, then quickly turning the camera 180 to get the hill side and the moon. The moon was so bright, and it was in a dark area of the image, so it showed up really well in the exposure. If that made sense?
For double exposures, generally, areas of dark for one exposure tend to show the second exposures better than the bright areas. This is because the dark areas don't have much image data from the first exposure, so if the data from the second exposure doesn't have to compete with much.
Hopefully this will make sense when you see the image. The sky is dark, so when the moon and hill occupies that space it shows up really well because it's so bright.
For editing, I wanted more pop. The colors also were very muted, and I didn't really like them very much. The first things I did were to convert to b/w and then up the clarity a bit. It looked really great at that point, so that's actually all I did. A little noise reduction, but nothing else.
Edit: I added some split toning, with blues to the shadows and orange/yellow to the highlights. Just a bit to add some flair to it.
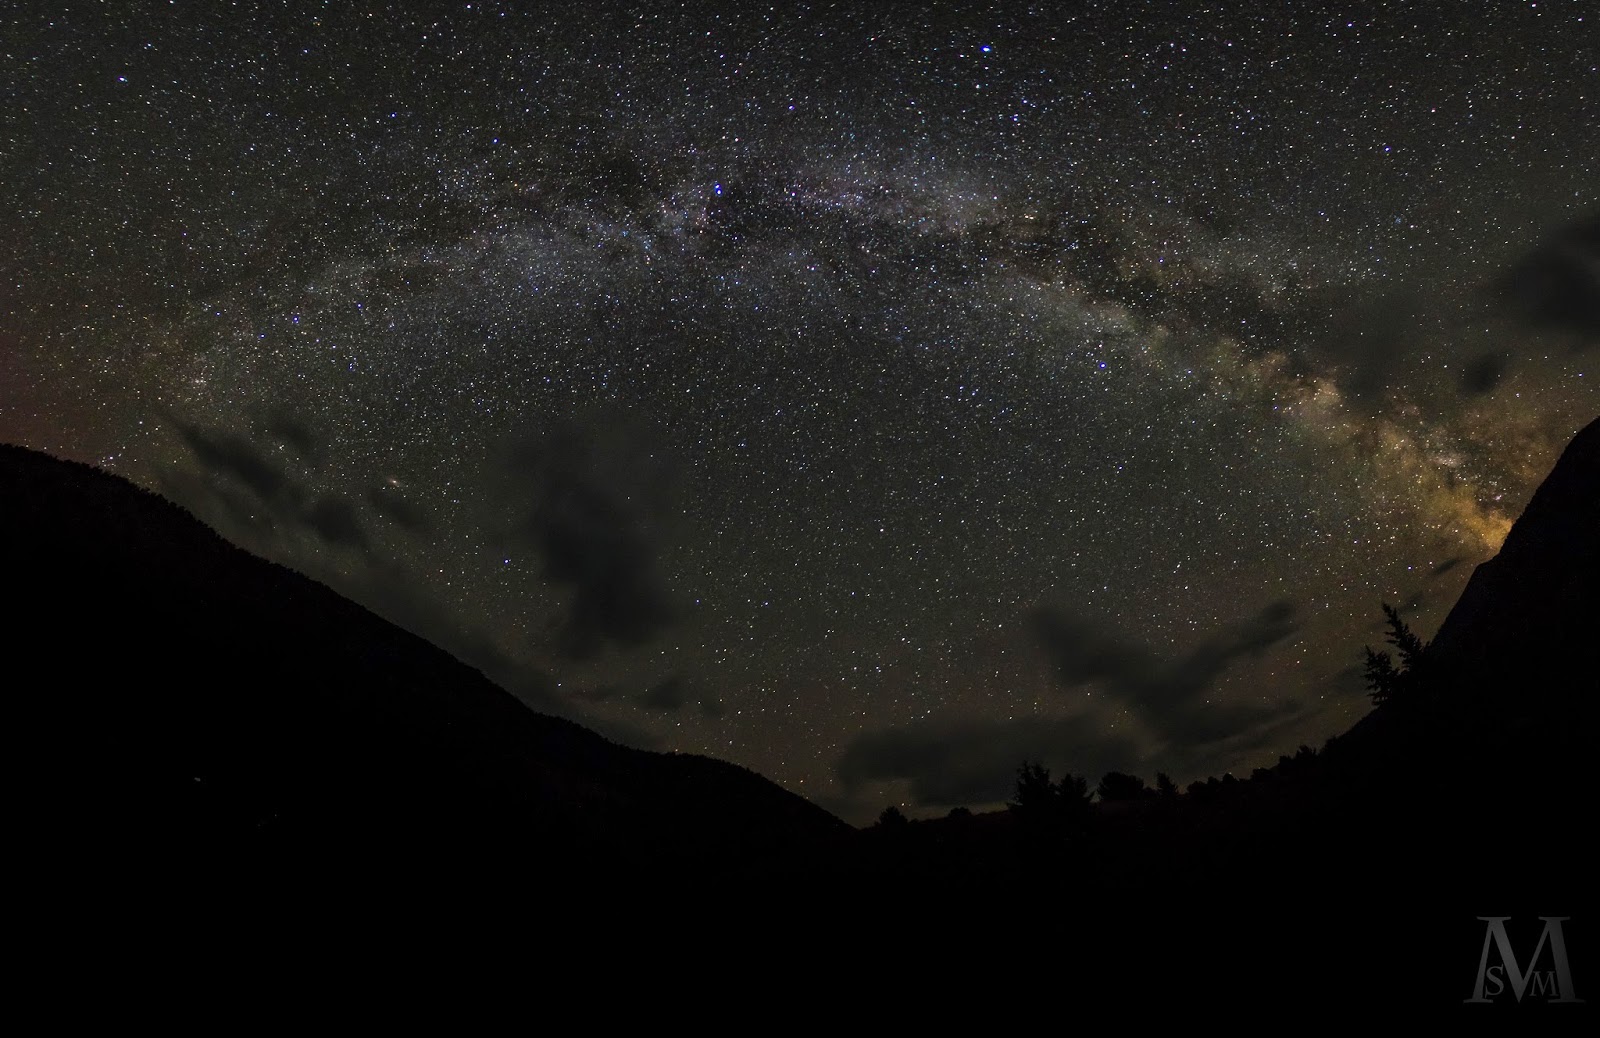
Coming home from the store I happened to notice it was a clear night. Not by looking up actually, but just because it was so freaking cold! It's 35 in Bozeman right now...7 C if you're from that part of the world. But it was a clear night, so I set up the camera in front of my house.
I knew right away exactly the shot I wanted. In front of the house, looking slightly up, start trails. Simple, but nice. I haven't done a photo of the house yet, so it's about time.
I threw on the 10mm lens, then picked a stop where I could see the most starts. I am in a small city, so there's a lot of light pollution. Only the bright stars are visible.
After I got my spot picked out, I did a test exposure at 30s, f2.8 and ISO6400. Way, way over exposed. So much. I bumped down to ISO800 and tried again. Much better. Checking the histogram is the only sure way to tell correctly what is going on, the bright view finder lies when it's dark out. Just make sure you have image data all through the histogram. One stop underexposed is OK if you're trying to freeze stars, but since I was doing star trails, theres no excuse to not do a proper exposure.
I could have shot at 30s, f2.8 and ISO800 to get a properly exposes shot. But there's two problems with that. Noise, and no star trails. Luckily, there's the same solution to both! Lower the ISO and raise the time and f-stop. I had six stops to go to get to a 30 minute exposure time, which is what I wanted. A few hours would have been nice, but I don't have that tonight. I have four stops of ISO to go down to ISO100, then go to f6.3 and I'm right in the ball park of a 30 minute exposure. A few minutes doesn't really matter with that long of an exposure. Three minutes would only be maybe 1/6 a stop, so I don't have to be perfect.
Once I got the shot (after doing a failed one because I forgot to switch to bulb and only did a 30s exposure), editing was really easy.
I upped the clarity, highlights, and shadows to give lots of contrast. This brought out detail in the highlights of the house, and also darkened the sky a bit to make the start trails pop a bit more. I also cooled the picture a lot to get rid of the yellow tint street lights give. Finally, I upped the clarity in the sky to make the stars pop even more.
Simple photo, simple edit. With great results, I think!
I'm really on the edge about posting this photo...I like it, but at the same time I really don't like it. It's clean but very busy somehow, I just can't put my finger on it.
The photo is of an outside light bulb, obviously turned on. It was raining out today, so there is some moisture on the glass around the light bulb, which makes for some interesting circles of confusion/bokeh effects. Not sure how much I like it....
But I do love the actual light bulb. The form of it twisting around itself, and the glow it creates is gorgeous. I'm really a fan of it.
To take the photo, I used my 50mm lens at f.4. I wanted to get just the bulb in focus, and try to blur out the glass and everything else. This helped clean up the photo a bit, and leave the bulb as the only point of focus.
To further isolate the bulb (also also properly expose it) I shot at 1/8000 at ISO250. I could have shot at 1/2000 at ISO100 (which I did later on), and have the same exposure with less noise. However, this shot was the one I like the most so I edited it.
Speaking of editing, first things first. Crop the sucker down to what I want. Which was almost a square image of just he bulb in blackness. I really wanted to isolate it. So I put an elliptical filter on it and darkened the outside of the frame to complete black. Then I raised the exposure on the bulb a bit, as well as the clarity. This just improved contrast on the bulb, really just aesthetic reasons.
Not much more to say... I'm considering doing something else for the blog tonight, but we will see. I like this photo, but I feel like it could be a lot better too.
Nick, Alex and I went out to catch the sunset hitting the mountains tonight. I was out on 19th and saw the sun coming through the clouds, hitting the Bridgers. It was near golden hour, so the mountains were bathed in the most beautiful purple gold light.
But of course, once I got Alex and Nick and got back to the view point, the clouds came in and....no more light on the mountains... sad face...
After HDR processing four times, then compositing the HDR in Ps, this is what I came up with.
It's ok, but not great. So we moved on.
There was still some sun left, so we drove out to some random hay field overlooking Bozeman. I hoped to get some better shots from up there of the sunset, but of course the sun went down before we go there...
Really out of luck now.
But Alex had forgotten his SD card, which ended up being a great thing. Because he started hopping through the hay field right in front of me.
I set the camera to f3.5, 1/10, ISO250 and drive mode. f3.5 to get enough light to shoot at f10, 1/10 to blur Alex a bunch, and ISO250 to get it bright enough.
Drive mode to catch as many frames of him as possible.
First thing I did in Lr was export all the frames to Photomatix Pro. Why did I do this? To make a background of course! Apparently, when you export a lot of the same scene, it actually serves to improve the overall tonal range of the photo. Don't know why, but the HDR looks awesome.
Next, I composited the frames in Ps with the darken blending mode, which essentially made a sequential image out of everything. So all the hopping Alex's in the same frame.
Finally, the two frames went together in Ps, with the hopping Alex frame on top with the blending mode of pin light. Why pin light? Because it worked. Don't know what it does, but it did exactly what I wanted.
Didn't do anything in Lr.
It's amazing how Photomatix can make such an awesome background just by compositing all the frames. Wonderful contrast, rich tones, perfectly exposed....just wonderful. And then the darken blend mode put Alex in perfectly, and so easily.
Today was another one of those days where I had no plan at all of what to shoot. None at all. But it was a warm night, so I just grabbed by camera (with just the 50mm on), and my bike and set out towards town.
Eventually, I ended up on top of the parking garage in downtown Bozeman. I missed the sunset by quite a bit, and I didn't have a long enough lens to get the moon, so I just stood up there for a while thinking about what to do. The view of the alley below was pretty cool, but I didn't see anything that really interested me.
Sometimes photography is about messages hidden in images. Most, if not all, famous photographers had careers based around this. But sometimes, a photo is just a photo for the sake of being a photo of something that interests the photographer.
There for, I dropped the aperture wide open, set the shutter to 1/3 second, and tried the freeze passing cars. There was a cross street a block up, and I just sat there for probably 15 or 20 minutes basically stalking cars. One would only pass every minute or so, so I had to be on it since I had a few seconds of a window. To help with the timing, I used drive mode. When a car drove past, I held the shutter and tried to pan at the same rate as the car. By doing this, I got about 3 photos of the car, and relative to the camera (theoretically) the car wasn't moving at all.
I only got a few good shots though. :( But one I really like. It even fits the rules of thirds and is properly exposed. Not bad for choosing exposure setting based only on aesthetic reasoning.
In Lr, I raised the clarity and shadows a bit, and dropped the highlights. This adds more contrast to the mid tones, and then recovers some of the washed out highlights. Not there's much of that.
So there you have it, a photo that is just a photo.
I went up toward Baldy today, not all the way up because it was pretty late in the day, but enough to get an awesome view or two. The whole trail would have taken me at least another hour, which would have put me on the decent at night...not the best idea. So I called it a day where I was and turned around.
After I took a few pictures of course.
I stopped at an overlook, and there was this cool little rock knoll that sloped down along the ridge. I thought it would just be perfect for a panorama. There was even a little dead tree on the right side to put in the frame!
With photos like this, it's nice to have a foreground element to ground everything. It helps create 3D space, and also really helps frame the photo, keeping everything together. Even though the edge of the frame is farther than the tree, the tree keeps your eye from wondering too far from the center of the image.
I tried out a couple different places for me to ride, but the one I liked the best was just in front of the camera. The distortion from using a 10mm lens really stretched me out, which I think helps add to the depth of the image. Everything is pointing toward the "trail," and then the mountains behind. I was a little unsure of blocking the mountains with my body, but I think the positioning works better than having me farther down the trail.
This is a three image panorama....10mm lens. Not much to say about that. In Ps, I had to use puppet warp a bit to bring the right lower edge back into the frame. Not anything advanced. Just set some point so that you don't warp the whole thing too much.
For editing, I upped the clarity and vibrance a bit, as well as the shadows. Not too much because I wanted to keep it very natural looking. Just enough that it compensates for the camera's inability to see the full dynamic range that the eye can see.
Question to think about, what if we could see the full range of light. No blown out suns or shadows too dark to see in....
Today I rode Curly Lake. I guess it's called. It's a mixture of different trails, but whatever. It went by Curly Lake, even though we were too busy grinding uphill to notice it. Once we got up to the top of the mountain, looked down and saw it immediately. But we didn't go back down...
On the way up to the top though, I saw this really cool little false summit and hiked up it really quickly. From the top I could see 360 around, and so of course I took a panoramic! The view was just incredible. You can pick out the three other people I rode with, way down in the saddle were stopped in for a sec.
As far as shooting, there's not much to say....it's a smart phone. Kinda self explanatory...
For editing, I also didn't do much. Raised the clarity and vibrance a bit, upped the whites a bit, and that's it. Super simple...
I guess that's all..hopefully something more exciting tomorrow!
Why mark -2? Because I think I did it better the first time!
I got a new pair of glasses the other day, some LaZer photo chromatic ones for biking. They're awesome, and work really well.
I was doing some product shots with Alex, and so I pulled out the glasses and did a quick photo of them.
One hitch though, I did use the same white background I had with the last glasses photo. Which was unfortunate because it really made the photo.
My set up was way more complex than the original set up though. I had two flashes cross lighting the glasses at 1/32 power. Pretty low for shooting at f16, but this was really just to add in some highlights and edge lights. Then I had one strobe pointed back to turn the background completely white. This is where things started to go wrong.
I was also using a soft box directly above the glasses to provide super soft light on them. Same as last time.
So problems. First, I put the backlight flash in a place where the specular highlight of it showed up in the sunglasses. Which is unfortunate. Kind of distracting and annoying. :( I should have had the strobe farther back so that it was actually behind the glasses and just lit the background.
Next problem, as I mentioned at first. The light box I was using has pretty wrinkled cloth in it, so it was very distracting in the photo. Very wrinkly and uneven. I wanted a seamless white background, and that's not really what I got. Sad face.
And further, the glasses reflected all sorts of stuff going on, so that's no good either! I'll have to figure out a way to get rid of that...not quite sure how at the moment.
Editing helping things a bit, I upped the highlights, whites and shadows to help remove some of the wrinkles in the fabric. This also made the image just look cleaner, which was the look I was going for. Not perfect though.
Think I've already used that title...but whatever. It's fitting so it stays.
Obviously, this post is about food. Why else would I title it "yum?" I went shopping today, and so I'm loaded up with all sorts of delicious food. Can't wait for breakfast, either going to be cereal, yogurt and fruit, or oatmeal and fruit. Or maybe eggs. Or maybe rice cakes and fruit and peanut butter. oh the choices.
But tonight, I wanted to try out this interesting style of lighting that combined hard light and on axis light. I read about it years ago on Stobist, but I don't think I've ever had enough lights to try it! Until now...Alex has the same lights as me, so I borrowed his and set something up.
I used raisins as my subject, mostly because I'd tried a lens and that hadn't worked at all. The shot that David Hobby got was on a cutting board and it was food, so I substituted by own food and also used a cutting board. Worked out very well.
To start, I turned on one light at a time. First was a soft box on one corner at 1/16 power. That is underexposed for shooting at f16, but I'll explain that later. With a lot of lights, there's a lot of light.
Next I turned on two hard lights. One opposite the soft box, and one in between on the other other corner. These were both to 1/128 power and mainly just to add some highlighting on the raisins.
Once I got that all set up, I brought in my ring light. I shot straight down with the 50mm, with the ring on axis. So I shot through the ring light, in other words. After a few tests, I figured out that the ring needed to be at 1/2 power to be bright enough. So really freaking bright. Even though the ring eats up 2 stops of light.
In hind sight, I think a lot of the light from the other strobes was being overpowered by the ring light. Maybe not entirely though, so it definitely helped add some contrast and texture to stufffff.
The ring lights purpose was to fill in the shadows. As in, all the shadows. That's what ring lights do, they fill in shadows when you use them on axis. The make beautiful light, especially when you use some hard light with the to add back some contrast to texture.
For editing, I started with upped the shadows even a little more and upped the clarity just a hair. Next, I added a elliptical adjustment to brighten the raisins and create a bit of vignette. To wrap everything up, I add some blue to the shadows and golden tones to the highlights. Just to add that little touch that I like.
In the end, it's what makes life interesting, right? Playing around, messing with stuff and seeing what happens. I know I've said it a thousand times, but that's one of the best things about photography. Having to ability to recreate the world around you in all these crazy ways, just by using a camera! Mess with some settings and everything goes insane.
Tonight I had a picture all set and ready to go, but there was something about it I really didn't like. I'd done it really fast and wasn't too happy with it. So I wanted to do something different. Completely different.
On the 50mm went, all the way to f1.4, and out to the porch I went! No idea what was going to happen when I got there, but that's okay!
As I stood there, watching the cars go by.... well you can probably guess the rest.
If you can't, I'll give you a hint... my shutter speed was 3.5 seconds and the pan lock was open on the tripod.
What do bright lights make when they move through an image? What do cars have that are bright? Do cars move? Can the camera also move? What happens when you move the camera and the car moves?? Let's find out!!
So I sat there for a couple minutes just taking picture after picture of cars going past. I panned the camera to follow the car and just had no idea what I was going to come up with. So fun :)
Out of the pictures, some unexpected happened. I got a few with cars frozen. Not completely, but reasonably so. I just my panning skills are pretty good, because that's the only way I could see over a 3.5 second exposure of the car moving that you can get a frozen car. Looks cool though!
I love the light trails going everywhere. Both uniform and the very organic lights. You can see where the car was pointed at the camera, and where the headlights went out of the frame because the car was then parallel to the camera.
You can see the photo though, so I'll stop talking.
For editing, I upped the clarity a bunch and the vibrance. Then I added a very slight cooling of the lower half of the image by way of a gradient adjustment filter. I just really don't like that evil orange glow from street lights.
Anyone that rides knows what I mean. The little sharp things you put your feets on. I got some shiny new ones today, and I haven't done many product photos lately, so why not tonight?
I dragged out my light box (my sisters old one because I got her a new one for her birthday), and stuck the pedals in it. I wanted to use the ring light since I haven't used it in a while, and it's a fun toy. So I stuck a strobe in to light the inside a lot, then shot straight down with the ring light as a center key/fill. Since it's such a large light area, the shadows were really filled in a looked lovely.
I shot at 1/125, f3.5 and ISO100. The strobes were at 1/16 each I think, and very close to the pedals. The ring light takes about 2 stops of light, so I had to be pretty high in power for it.
Here's a quick photo of the set up so I'll make more sense. I had the camera just to the right of the ring light. The lens was actually touching the light.
As far as positioning the pedals.... I wanted the DMR logo and the Vault to both show, so I simply stacked them in such a way that was happening. Nothing to it :) Angles are nice, so they are both off tilt a bit and form lots of pretty shapes.
Dust. Once I got a good photo, I realized the pedals were covered with dust. Like covered. It was bad. So I cleaned them off and re did the photo. The resulting image was so much more clean than before. ;)
In editing, I raised the highlights and whites a lot, as well as the contrast. This just got the whites very white, and the blacks nice and inky. I raised the saturation of blues for the pins, and then dropped the yellows, oranges, and reds to get rid of those colors. Just helped clean up the photo a bit and remove distractions.
This weekend, I went on a little trip to the CDT trail near Dell, MT. I don't actually really know where we were, but it was somewhere near the Italian Peaks! The goal of the trip was to get some work done on the CDT (continental divide trail), but the weather had different plans for us. The first night was filled with thunder, lighting, and lots and lots of rain. Same story with the next day and night. The first work day was pretty much just a hike through 3 inches of mud to the work sites, then scraping mud around or cutting soggy branches hanging over the trail. There was some work to do, but not as much as we'd hoped for. And everyone was soggy from hiking in the rain all day. Some work got done though, and everyone had a great time despite the shittyness unfortunate nature of the weather for the day.
Plus there were epic burritos for dinner, which helped a lot.
The next day I was sick in camp all day, but what I've been told is the rest of the group just hiked all day and found about as much work as the day before. The rain in combo with cows, cows, and cows ruined the trail surface, so not much work could be done in those sections, and there weren't all that many drain dips/trees to work on. It sounded like everyone got a good hike in though, so that's a plus! And another epic dinner happened that night in the form of quinoa salad.
Last day was mostly spent traveling, so nothing to report there.
Despite the weather, sickness, and not being able to help on the second day of work, it was still a very awesome trip. I mean the food was great, so what more can you ask for? ;) No seriously, it was a great way to spend a weekend with awesome people.
Of course I brought my camera, and I've got quite the collection of photos and even a little video to share! It's taken me about 4 hours of editing non-stop, and that's a pretty long time to edit for me. Editing every day for almost a year now, I'm pretty fast, and I've had to pull out almost every trick I know tonight to keep things going smoothly. There were about 500 pictures to first sort in picture to edit, pictures to turn into a time-lapse, and then later which pictures from the time lapse to turn into singles and then a collage. A lot was going on in my head. Batching bracketed photos at the same time as editing panoramas, as the same time as batching settings for the time-lapse is like three things at once! Gotta love task switching. Much entertaining to try to keep track of everything. I'll stop things there and just drive into the three photos for the blog, and then I'll give a little lead in into the rest of goodies for tonight.
So first night was semi clear, and the stars were awesome. One of the group left a light on in his tent, and I grabbed my camera for a long expo of the scene. There was a stand of trees behind the hill the tent was on, so I faces sort of at an angle to them so that the tent fell on the lower left third intersection ( rule of thirds if you don't know ) and then the stars would be in the upper right. All about balance people. The shutter was open for 714 seconds (no idea what that is in minutes) at f2.8 and ISO800. Got a wonderful exposure from that. The stars really started to do the spiny thing as I facing due north (is that how you spell it?), and the whole composition became very spherical. The 10mm fisheye I was using really distorted the edges so it looked like the whole photo was circular. Even the hill on the right side and trees were at the right angle to support the composition I was going for. Wonderful.
For editing, I upped the clarity and vibrance. Also cooled down the temp a bit. Not too crazy of an edit really.
Little noisy, but that's okay.
So the next day's pictures might be one of my favorites all year. And I wasn't really even trying! Funny how that works.
After everyone got back to camp and ate, we made a wonderful fire and talked for hours. The whole time I had the camera running a time lapse. One picture a minute, set to Av at f3.5 ISO200. So set up was super easy and I didn't think but about it. I framed the group and fire on the lower right third, put a tree in the upper left, and then put some sky in top and ground filling most of the lower third. All this to keep the balance nice.
In Lr, I did the following. Clarity and vibrance up a lot, highlights down, shadows and whites up. This gave the photo an HDR look, and really brought out a lot of detail. It made the stars and fire really pop out. There's a lot I love about this picture, and I sure just by looking at it you can figure out what those things are.
So on to the final one.
I've said so many times it's worth it to see the sunrise. You should believe me. The sunset is pretty, but you can see the sunset every day. The sunrise is more difficult to see because you have to actually get up when it's dark out! In the summer that is, in the winter it's not too hard but then again you're probably in a classroom when it comes up so.....I digress.
I was up early this morning, and took a panoramic of the sun rise on the hills in the distance. There was this magical purple glow going on, and the rolling hills were just amazing. I simply shot in Av again at f16 and ISO400 to get a fast enough shutter to not get blur since I was at 135mm.
Pano'd it in Ps, then in Lr I upped the clarity, shadows, and vibrance a bit. I also toned everything a bit more purple to match what I saw. I love how it turned out. Not the most dramatic photo ever in the style I usually do, but it something I haven't done much of.
As for the rest of the photos, as usual, ask if you want to know more about one!