Thursday, August 28, 2014

Ruined by Man

Tonight was one of those epic Montana sunsets, where light beams were literally shooting out from the horizon. It must be the moisture in the air in combination with the openings in the clouds that makes the beams so epic. Just before the oranges of the sunset came on, four light beams shot out of the sky right in front of the house, so I grabbed my camera and ran upstairs to the porch.

I started shooting at about 50mm, so a little bit telephoto but not much. There was a tree that happened to by right where the sunbeams came together, so I used that as a focal point since I didn't have time to get up higher.

I shot at ISO100, f5, and 1/160. Nothing special to report.

Unfortunately, I realized that there were power lines cutting right through the frame! They weren't that bad though, so I thought I could just correct them in Ps later.

In editing, I raised the clarity and vibrance. I also made local adjustments over the light beams that raised the highlights and clarity a bit to make them stand out more. Other than that, I did no editing.

And I left the power lines in. Yes, it would have been pretty easy to get rid of them, but it seemed fitting to leave them in a ruin such a perfect natural event. There are a lot of natural wonder and beautiful places that have been tarnished by artificial things, so I let this photo capture that somewhat. What really surprised me was how long it too me to see the power lines during shooting, since they're something I suppose I've just gotten too used to seeing everywhere.


See you tomorrow!

Wednesday, August 27, 2014

it wasn't me mom...


It's steam btw, not actual smoke from a cigarette or something. Just for the worried mothers.

Anyway, I went down to the abandoned parking garage tonight, and shot someone blowing out steam. That sounds really weird now that I write it out...

But it looked really cool, so just bear with me here.

I was shooting with a 50mm at f2.2, 1/200, and ISO100. There was a single strobe backlighting the person set to 1/128 power, so super low power. I didn't need much for two reasons. One, I was just using it to light the smoke, not  the person. Two, I was shooting very open, so a lot of light was let in.

It was really dark in the garage, so I used live view to focus on the subject, then hoped it stayed in focus while I shot. Luckily, it did! For the most part at least.

Since I was at such a low power on the strobe, I could shoot almost in burst mode and not worry about recycle times or draining power. Just started shooting when I saw the steam, and stopped a little while later.

Of the shots I got, I chose one where the steam pretty much made a solid colume going up. Not too solid, but solid for steam. I cropped it down to a very skinny ratio, so you eye just follows the smoke around.

Converted to b/w, it looks fantastic, and even more awesome when I raised the clarity all the way! I also added a local adjustment over the face to make it a complete silhouette. Faces are too distracting. Humans are very very good at recognizing faces, so if you have one in the frame it will almost always be a focal point whether you want it too or not.

That's about it! Not that complicated of a photo, but with really cool results! Backlighting semitransparent things always has really cool effects.


See you tomorrow!

Tuesday, August 26, 2014

Bug I Found

Just got some internet tonight, so hopefully the posts will be back to the regular one a day.

For last night, I set up the macro rig and took some pictures of a little bug. If you haven't seen the macro rig, I've got a lot of post on it, so it shouldn't be too hard to find.

For lighting, I used just one soft box with a 560 in it. The super big surface area compared to the bug made some incredibly soft lighting, which I really liked. A ring light would have been cool, but I just thought of that now. So maybe next time I'll set up the ring flash and do something with it!

I've made another video, and I explain the whole process of the photo in that. May have forgotten to mention the lighting, so that's why I mention it now. Check out the video though, and it will fill you in for the rest.


Now for tonight...

I went up the ridge on the M trail in hopes that there would be a good sunset like there was last night. Unfortunately, there was not that great of a sunset. It was decent, but nothing like the glory that was last nights golden hour.

I still shot it though, since you can do a lot with editing, and it would probably look pretty awesome anyway.

First things first, I made sure I got up there at least 45 minutes before sunset so that I could make sure I was set up and ready. There's been so many times that I've just rushed and missed some little thing that really affected the photos quality. The big thing that I sometimes miss is to get the tripod level. When making  panorama, it really really helps to have a level tripod. This makes blending everything so much easier, and you will get a taller pano out of it too.

After you get the tripod set up, figure out if you want to get a taller pano and shoot portrait, or just go with landscape. Landscape makes shooting quicker, but you won't get as much vertical coverage. I was shooting with a  fairly wide lens, so I went with a landscape approach.

Now that you have the camera set up on the tripod, focus the thing. Use live view and digital zoom in 10x to make sure it's spot on. Auto focus often gets screwed up, and you can't really tell looking through the view finder. Switch to manual mode after so that you don't screw up the focus later.

I added a polarizer in this step, and made sure it was rotated the right way before I focused. Basically, a polarizer will make the colors richer and the sky darker. Make sure you have everything done on the lens before you start messing with the camera.

Settings depend on the location and light levels, but for tonight I shot a bracketed sequence at -2.0.and +2 EV. This gave me all the tonal data I needed. The setting were based off of a reading from 45 degree to the sun. This is a balanced area, so that you don't meter off the sun or the shadows to much. You'll get right in the middle so everything looks proper.

Set your self timer to 2 sec so that the camera takes the bracketed sequence automatically, and that start shooting! I usually use 30-40% overlap, 50% is better, but with such a wide lens it's okay to do less. Shooting from a Phantom or with a tele I would want to have more.

Now for editing, start off by choosing your shots. I liked the last sequence I shot just as the sun was dipping down. I selected three shots that were taken 45 degrees to the sun. So again the middle exposure. I did an HDR edit on those in Photomatix, which was actually just using the natural preset. If the 45 degree shot looked okay, then that ensures that the shots into the sun and the ones off to the side also will be okay. If I edited ones looking into the sun or off to the side, then the other shots would be very off exposure, or color, or some combination of the two. And with a panoramic every shot has be have the same metadata for it to stitch together nicely, so you want to meter and base your initial edits off a neutral photo.

Batched all the photos, then went into Ps and made the panorama. Cropped and then exported to Lr.
In Lr, I raised the shadows and clarity just a tad. Then I raise the saturation of the greens and yellows to make the grass pop out more in the valley. Finally, a little vignette. I kept this one as natural looking as I could. With color HDR's, you can overdo it realllllly easily.


See you tomorrow!

Sunday, August 24, 2014

Rainy Weekend

It's been a very rainy weekend. Just a few hours ago it let up, but all of yesterday it poured and poured. 

The photo from yesterday was taken in the abandoned parking garage down on main street. It's got a ton of really amazing colors in it, and yesterday's lighting was ideal for photos in there. 

Today, I went out to an area behind Peat's Hill and did a panoramic of a wheat field and the Bridgers. I wish the lighting was better, but it just wasn't cooperating. Editing helped a lot, but it could have been so much nicer with dramatic lights. I'll probably be going out there again soon for some sunsets. 

I have a video prepared for everything, so I'll let that do the rest of the talking. 


See you tomorrow!

Saturday, August 23, 2014

Back to internet at last

I've been traveling, packing, and then finally living in my new house for the last week or so. No wifi when traveling, and there's no wifi in the house either unit Monday, so I'm stealing campus wifi in the mean time so I can post! I haven't been slacking on pictures though, I've got some good ones for this post, along with a couple videos too!

The videos go along with each of the photos, so you can see what I did for each and why I did it. Hopefully they aren't too much of a pain to load!


https://www.youtube.com/watch?v=eO_O5NrNGTY&feature=youtu.be

This one won't go in right now, so just check out the link above!


See you tomorrow!

Saturday, August 16, 2014

Noisy little flying machine

Probably going to be pretty quick post tonight, not much to tell about the photo.

Maclin and I took the quad up above pear point tonight...to a certain height you don't know. But it was high enough that we could see all the way to the north end of the island, Shaw, and Orcas. The sun had already set on the ground, but way up high the sunset was still going strong. The ISO still had to be cranked up way high, but it looked amazing. I took a bunch of shots because I was planning on doing a little planet, but the camera cut out half way through so I couldn't finish it. :( sad face

But there were still some really cool photos! A little, I mean very noisy, but still cool. To start editing, I cropped it down into a longer aspect ratio, which I just liked better. Then the clarity went up a bit, and vibrance a bit, blacks down a bit, then the shadows up. All this brought out the details in the midtones and highlights a bit, while keeping the darks dark. It did introduce some noise, ugh, but noise reduction helped out a bit with that. To finalize, I added some saturation into the sky and the water. Just helped...with stuff. everyone likes color right?


Also added a vignette, just really suited the photo.

See you tomorrow!

Friday, August 15, 2014

Lights and stuff

Another night at the fair. Already done a night of just light trails with the rides, so I decided to try some thing else.

There's long exposures from a stable platform like a tripod, and then there's long exposures from handheld. The objective of hand holding long exposures is to have a lot of blur. Purposely creating blur is the name of the game, for the sake of creating something completely different than what you can get from stable shooting.

My favorite approach to unstable shooting is to just go crazy with the camera. Shake it around when the shutter is open, and you get a ton of crazy light trails. As long as you are looking at bright lights.

That's pretty much what I did tonight. Set the aperture to f9 and then put it to blub. Really just had fun messing around with the camera. Found some cool looking spot lights on the rides, and just messed around until I got something I liked. There's not much to  it.

For editing, I upped the clarity a bit as well as the vibrance, but that's really it. It's mostly straight out of the camera.


Couple other photos from tonight.


See you tomorrow!

New Time Keeper

My old watch broke this week. Might be an old battery (probably), but it was acting very weird so I thought why not just get something I know will last a while longer.

Enter Seiko watches. Don't know much about them, other than I love their watches. The one I got is an automatic 21 jewel one (whatever that means), so it never needs a new battery because it doesn't use one! It's powered by the motion of wearing it, very cool right? Plus it's sleek, thin, and metal. Perfect for me. The only thing that could be better would be if it lit up. But that would require a battery, which is a no no. It glows in the dark, and that's enough.

Just discovered Seiko makes a $27,000 watch...why...

Anywho, I used the same kind of set up I used for the last watch photo. The soft box on the right set to lowestttt power setting. On the left was a 560 with the grid on it. Nice big soft light to make nice specular highlights on one side, and the grid to provide some little highlights on the other side. I love using hard light as a highlights/backlight and then filling in the shadows and whatnot with soft lights.

In addition to the lights, I set up a big white reflector on behind the watch to throw some more light on the subject.

I tried shooting on black, with a pillow on black, with a pillow on wood, but I finally settled on white. Just white. Simple, elegant, cliche....but that doesn't mean it's not good. Maybe next time I'll try wood again. But for now, white works really well.

I shot at f7.1 (because lights were so close and very very bright), ISO100, and 1/200.

So editing...I went into Ps and selected out the watch from the background. I feathered this selection a  lot so make the transition zone larger and softer. I did this because I then brightened the area all around the watch, which helped make the whites much whiter and let the watch stand out more. I debated with making everything white, but left a little gradient here and there.

Then, I grabbed a logo off one of the other pictures with one of the pillows. Simply feathered the selection, applied the same brightening that I did before, and it blended in nicely.

Finally, in Lr I added a elliptical adjustment to the watch face to brighten the middle up a bit, and also increase the contrast. This made the face stand out more, which is nice because that's really what the photo is about. I also went through with a healing brush to get rid of some dust spots.


Side note: the last time I took a watch photo, I took it at 10:20 and thought that was late. Tonight, I took it at 12:30. Which isn't that unusual for me now...

See you tomorrow!


Wednesday, August 13, 2014

Fair week

As a signal that the end of summer is near, it's fair week! Today was my last day at the shop too..summer has gone by way to fast!

So anyway, Victor and I arrived at the same pretty much as the rides were shutting down and everything was closing down. But that's okay! The zipper and paratrooper/octopus thing was still running, so I focused on those two.

When shooting rides with a bunch of movement and lights, I wanted to drag the shutter a bit to capture that motion. I started with the paratrooper because it spun around in a circle, which is a very cool geometric pattern when you get light trails. I put the center of the ride right behind another light ball in the foreground, so that there would be a sharp foreground with the light spinning around it...it makes more sense in the photo.


Great circle of lights around the light ball. I would have liked to frame it a little differently, but just after I took this the ride shut down. :(

So then I moved to the Zipper!

Same settings: ISO100, f5.6, and 2 seconds.

clarity up, vibrance up, blacks down, shadows up.

I just got the big neon sign and timed the light from the ride so that it made a big trail right behind the sign. Turned out pretty well!

All in all, pretty good results for such quick set up.


And a bonus picture of Ben and his glasses because funny.


See you tomorrow!

Tuesday, August 12, 2014

Body in my room

So there has been a dead moth in my room for about a week...I've been meaning to do a macro with it, and finally I got a chance tonight when my cf cards arrived. It's very nice to not have to connect to a computer to shoot.

So for the moth...it got put in a little stand clamp. That little stand is exceptionally useful for macros... I wanted the background to be the light wood from my table to match the color of the moth. The moth got pointed straight up, almost over vertical actually, so that I could shoot straight down.

Here's the set up of lights. Soft light right for main light, hard light below to add some texture and shadows.

The angle this photo was taken is also about the angle the blog photo was taken. Just fyi

You can also see the macro filter I was using. 10x magnification


For editing, clarity +79, shadows +42, vibrance +62.

I also did some vignetting...


Keep in mind the composition, the moth is on the upper right thirds intersection.  I gave some room on the left to balance the picture, as the moth is looking left.  I would have liked the clamp to come from the bottom left and circle around, but it's not a perfect world.

See you tomorrow!

Monday, August 11, 2014

Clock is ticking

Had a late drill tonight, and had zero ideas for pictures. After about half an hour of struggling around in the garage trying to come up with something, Victor found this old pocket watch. It was all tarnished and basically just looked really cool.

I already had the soft box on one of the strobes at 1/8 power, so I just stuck that to the left of the watch and it actually worked out perfectly. The watch was being held in this little soldering clamp thing, so that just sat on the table with the soft box off to the right of it. Pretty simple set up.

Camera settings: ISO100, f8, 1/200, 135mm.

Editing was super quick because I was tethered to the computer the file was already on it. Highlights up, clarity up, vignette, lower exposure a bit, local adjustment on the watch face to up the highlights and bring that back from the vignette. All done.


See you tomorrow!

Sunday, August 10, 2014

Zoom zoom

hi, today i took pictures. many of them, i then reduced the large quantity of pictures down to seven. then two, now i have just one picture. i've converted it to b/w. from there i have added lots of iso's and confusing words. now it is internet,
gudnite

sinsirly,

          bacon


Sadly, that account is very accurate. Victor (bacon) and I went biking, and since my cf cards are toast, we used the gopro on interval photo shooting picture mode thing. It took a picture every .5 seconds as we rode, which obviously made a lot of photos. The lighting was pretty low, so most were all blurry and noisy, but a few were usable.

Kinda. not in color. wayyyy too much noise to use color, so I converted to b/w. it helps hide the noise a bit. I realized they also looked a bit flat and uninteresting, so clarity went up. Then highlights just a bit. That's about it though. The one I chose, I added a bit of vignette to.

As for how I chose, I first looked at composition, then just chose the one I liked the most from that. Nothing fancy, sometimes just what you like is more important than getting something technically perfect.


See you tomorrow!

Inky Sunsets

So last night my last CF decided to die, which is why I couldn't do a post until now. It took all night to transfer the pictures to my computer, and I just didn't want to risk using the card again.

But on to happier times! Last night, I was treated to a sunset kayak tour with Discovery Sea Kayaks! I basically just hung out on the water for the evening taking pictures for them. The sunset was half way decent, and some good shots definitely came out of the tour.

I've never shot from a kayak before, and it obviously posed quite a few challenges. The first was keeping my camera dry. Easy, dry bag lashed to the hull in front of me. But then that only kept it dry when it was in the bag...I just accepted that it was going to get some salt spray on it when I was actually shooting with it. Which I guess is about as bad as using in the dust and with sweat dripping on it...etc. The camera is just a freaking work horse. Same with the 18-135 lens. It had all the range I needed for the evening, and I really didn't have to worry about killing it too badly. It's been through more than even the body has.

As for shooting, I mostly tried to wait until the sun set really got going before I started shooting. Like it said, the sunset wasn't thattttt good, but it did cast some really nice highlights on the water, and super saturated everything. A routine I got into was to shoot silhouettes of other people in the group with the sunset behind them. I was shooting in Tv mode with an auto ISO, so the camera took care of most of the exposure part. I just had to tell it what to meter off of. Depending on where you focus and where you point in the final framing, the camera will expose for the shadows or the sunset. I generally tried to get half way, so in post I could recover both. Getting the framing right just takes practice, and a bit of luck.

From the ones I got and liked, one edited photo really caught my eye. It was taken just as the sun went down, so the overall contrast was pretty low. I was able to get almost the full tonal range of the sunset and the boat in front of me (which was positioned perfectly thanks to my awesome kayak partner!).

1/320 to stop all the motion. kayaks move a lot in the water. f3.5 for light. 18mm. ISO400 for proper exposure.

Develop settings...
Highlight up 19
shadows +92
whites +17
vibrance +51

Local adjustment over the kayak that upped highlights and shadows +50 each. This brightened them up a bit while keeping some of the contrast.  Which is basically the whole goal on how I process. I try to keep the overall contrast consistent while bringing out the details.


Now for todays photo...totally different.

Tonight, Victor and I tried some ink in water photos. Quite the learning experience...use a polarizer next time.  We ended up using a giant black backdrop behind us to keep reflections down in the glass, but I was still illuminated by the flashes. Polarizer needed to get rid of that or at least tone it down.

The set up was fairly simple, fish tank with water in a mat box with two strobes. One in the back to light everything up, and one of the side to provide some cross light. Both set to 1/8 power.

I shot at 1/200 for motion stopping, f16 for DoF, and ISO400 to keep everything nice and bright.

I also shot tethered to Lr so that I could go directly from the camera to my hard drive, so no CF card needed. I highly recommend doing that, well worth it in controlled situations.

What really makes the photo tonight, IMO, was shooting from a very low angle so that the bottom of the water turned into a mirror. I've actually flipped this photo upside down, so the water on the bottom is actually the bottom of the layer of surface tension. If I am using the right words...it's late.

Anyway, for shooting ink, Victor counted down and then just squeezed ink out of syringe into the water. Which looked awesome. We experimented with swirling the water, doing drops...all kind of stuff. There's a whole album of the pictures on fb, check it out and I'd be happy to answer how a specific one was made.

For the one I'll show here, we swirled the water just before the fact so the ink took a very odd trajectory when it was squirted.

In editing, whites +100, shadows +21, clarity +37. Much details, very very high contrast. I reverted to my stock editing process that I do for this kind of planar image. I try to make it as isolated and simple as possible. I really try to do this with all my photos, clutter just annoys me. Doesn't usually work out as I want it to, but I try.

Even though I didn't get the quality of shots I wanted tonight because I forgot to use a polarizer, I'm still happy with what I did get. It's definitely something to do again soon.


See you tomorrow!

Thursday, August 7, 2014

Just a short jaunt on the beach

And by short, I mean a 3 mile run in sand with 20mph winds. Much fun :) A little annoying with sand in the shoes, but I can't complain with a run by the moonlight.

To explain, it was super windy today, and so the surf on the west side of the island was really big. There are some rocks way down the beach, and when the big waves hit them it shoots water everywhere.

But of course, by the time I ran all the way down there, the light was too low to take any good pictures of the spray. I need to use at least 1/500 and at 1/50 my ISO had to be at 3200...so not really a good combo. There's no way I could get to 1/500.

Change of plan. Shoot the water on the epic little rocks on the beach. Well, they were actually large rocks, and looked really cool with the water over them. I shot at ISO100, f5.6, 13s, and 100mm. I hiked up on a hill right next to the beach and shot down on the rocks. It took a little while to get the right composition since the rocks were spaced kinda odd. But I got some that I liked, the best one being of the rocks just above the water line and then a nice gradient down to the water. I love how the water swirls around and between the rocks.

For editing, I stretched the RAW as far as it would go. Shadows all the way up, highlights all the way down. Clarity all the way up. Contrast up. Whites up a lot. Vignette a little. Here's the before and after.


I love the first one, but the second is awesome too. But now seeing them together, I think I'll combine them and maybe do a photomatix version.


Turns out no photomatix, just taking the setting from the b/w, toning them down a bit and then making a color version. But I still like the b/w better.

See you tomorrow!

Landing on the Moon

So I got a new bicycle today. :D Considering I live in Montana in the winter, I decided it would be worth it to invest in a fat bike for riding in the snow. Even it was for one season, being able to ride all winter is well worth the money to me. The bike I eventually decided on was the Surly Moonlander. I reallyyyy liked the PugOps (just because of the name) but the Moonlander has a lot better spec and has much wider tires. And the for the deal I get it at, I can't complain about the price difference.

Building it up today was so weird. I don't think I've ever had a bike come in a super sized box because the wheels are bigger than the frame. Chuck and I had a good 5 minute session of disbelief when we first saw the things. 4.8 inch tires are ridonkulous(ly awesome).

After I got it all put together, I of course had to do picture of it. And of course it was 10pm. Hmmm, why not go to the beach and ride it under the moonlight! It's a Moonlander after all.

I met up with Victor and the usual crew at the beach, and we set up with the shot. It was a challenge to get the right composition. At first, I was looking down a straight section of beach, and it just wasn't working. Turning around to the curved part helped, and Victor's suggestion of moving toward the water helped a lot.

The bike rides amazingly btw. Deep sand, drift wood, seaweed...you name it the bike just ate it up and forged ahead. It was truly incredible to ride that easily over those kind of obstacles with almost no problems. I think I'll be having some fun in the future with this thing....

For the photo, Cody triggered the shutter, then I rode down the beach till he yelled stop, and then we repeated that a few times. This painted the ground with my head lamp. I underexposed by 2 stops so that the light from my headlamp would be the only bright light on the ground.

After we got those, I took a properly exposed shot of the landscape. This was at ISO250, 18mm, f3.5, and 30s.

To wrap up shooting, we popped a strobe on me from about 20 ft away and up high at 1/8 power. We had the manual remote hooked up, so it was a 30s exposure with me frozen in it.

For editing, I picked out my favorite shots and headed over to Ps. The lighten blend mode took care of most of the blending, and layer masks took over the rest. I just took the light trails from those photos, and just the frozen image of me from that layer. From the proper exposure layer, I drew in some of the sky and all the water to get some pop out of those areas.

In Lr, I first converted to b/w, then raised the shadows and blacks all the way. Well, the blacks only a bit, but the whites a lot. I also upped the highlights a lot. I then did some local adjustments to the sky, water, and frozen me. To the sky and me, I upped the clarity. For the water, I just upped the highlights.

I went through a couple different versions of the same image, so here's the two last ones. I thought I was done, but then I found something and changed it.  Can you tell what?


See you tomorrow!

Tuesday, August 5, 2014

I Dunno

So plans changed last minute tonight, so I ended up taking some very fast pictures of some very wilting flowers. Said flowers were just sitting there, so I put on the 50 with the 10x macro adaptor and started shooting away.

The camera has a hard time focusing with that combination of optics on though, and at f1.4, the pictures were all very very soft. I didn't want to shoot for very long, so I just started trying to incorporate that look into what I was shooting.

To get things even more blurred and crazy soft, I shot from a low angle to increase the distance between my subject and other parts of the shot. This blurred everything a lot more as it effectively decreases your depth of field.

For editing, I did something I never, ever, do. Decrease the clarity all the way. Crazy, I know. But I actually love how it turned out. That, in combination with upping the vibrance and luminosity of the reds and oranges, just made everything hyper realistic but also very surreal. It's just a very odd representation of a flower, that I really like.


See you tomorrow!

Monday, August 4, 2014

Moar Pi

Finishing up Emma's pie blog today. We couldn't do a single piece yesterday because the pie was still hot, but tonight we could.

The set up was exactly the same as last night, only I upped the power of both the strobes by about a stop each. So there was twice the power from each strobe, and 4 times overall. Theoretically, I could be very very wrong about that too. In practice though, it only gets maybe 2 stops brighter, but that still helps a whole lot with making the white cloth very white.

Another trick to get wrinkles or texture out of something is to use a big light source that is in line with the lens. This fills in the shadows and makes everything look very flat. But be carful not to overdo it on the subject, which is easy to do. Fortunately, the very soft lighting still worked really well with the pie tonight, and so I left it as it was. The backlight was semi directional, the front a little less, so there was till nice texture in the pie and berries. The specular highlights was awesome as well from the inside of the soft box.

Here's the edit. You can see how I initially go with one photo, then change my mind really fast and go with another one at the very end. I just liked the composition way more with the other one.


See you tomorrow!

Sunday, August 3, 2014

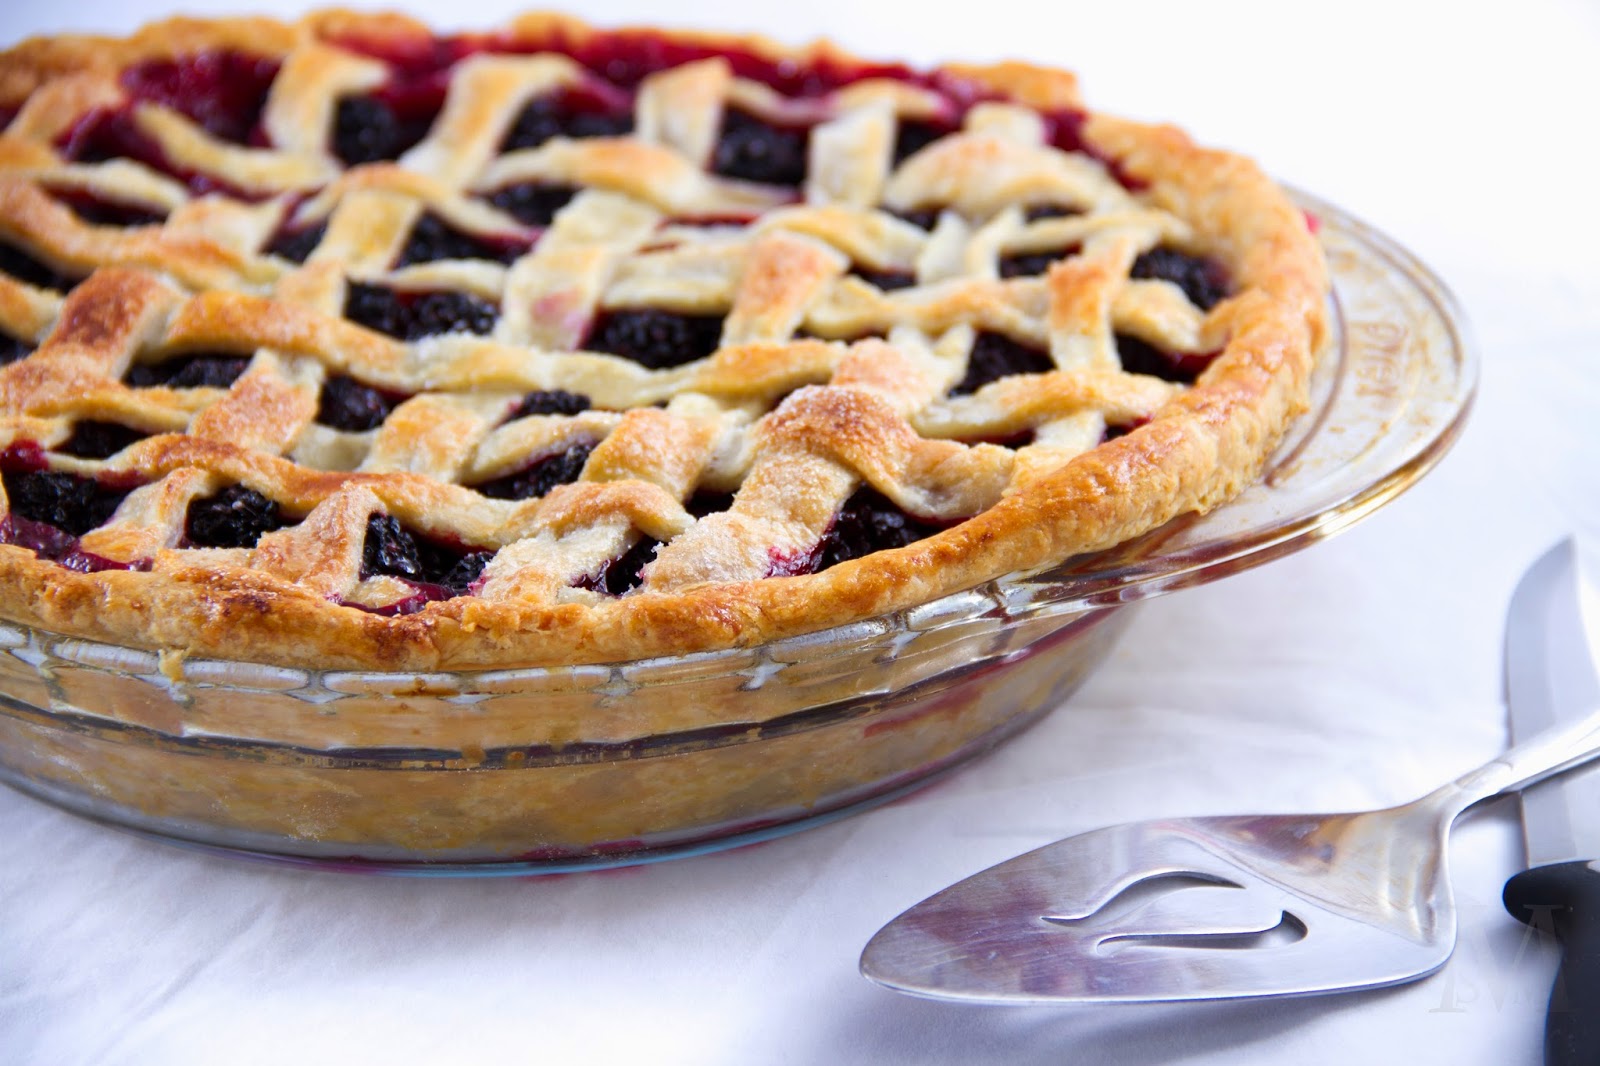
What flavor? PIE FLAVOR

My sister made an epic pie today. Epic. I like pie. But before I got any, I had to take photos.

For said photos, the usual photo set up was used. With a few modifications. The lighting set up was opposite, so the fill light strobe was to the back and right pointed straight up to provide a very soft, semi directional fill. The other strobe was was to the front and left pointed to the wall to make a soft, but directional key/fill. The idea I was going for was to make a nice, white background and have the pie in very soft, wrapping light.

It worked out pretty well, it's really hard to tell how something is actually going to look when you get it on a big screen. What I would do differently next time is to ramp up the power output of the backlight strobe to make everything around the pie very white. You can still see the texture of the background and the front is fairly dark....  But that's okay! I still like it, it's a different style that I usually do.

For this time, I've tried to not focus on getting the whole pie in the shot as getting pieces or just bits in a composition that looks interesting. For this shot, I liked the composition of the utensils fill in the lower right, and the pie makes a nice circle for the rest of the upper left third. Shooting from a low angle helped to make the pie look big and full.

Editing...what did I do for editing. Whites up...both in over all tone and in a local adjustment around the white cloth. That's about it though. I was a little bummed I didn't get a better specular highlight in the utensils, but that's okay.


See you tomorrow!

Orcas Porcas It's 1 in the Morning

Soooo, last night and today Maclin and I went over to Orcas for photos and some videos. Friday night was probably one of the most amazing sunsets of the summer, if not the year. There was super high, and almost complete cloud cover. At first we thought that was going to ruin the sunset, but it turned out to be the thing that made the night. The sun reflected off the ocean, the land, and basically everything to turn the world into a surreal orange glow land thingy. Plus, there was mist and flog along the mainland so that everything was just exceptionally epic.

For shooting this one, I shot at ISO200, f5.6, 1/50 and 41mm. I wanted to zoom in a bit to get more of a view of the mountains, and less of the foreground. I got pano shots of both focal lengths, but I really liked the tighter one. But since it was zoomed in, it took 20 shots to get a full 180 degrees. And used a tripod, definitely used a tripod.

Here's what the editing process looked like.


And for the next day, we got up for sunrise, and it was kinda lameeeee. No clouds :( but down by the lake it was pretty cool! The sun was hitting a mountain, and it was reflecting off the lake. Pretty cool shot, so I took a 3 shot bracket starting at ISO100, 19mm, f22, 1/20. I wanted to use a longer shutter speed so that the water would look nice and soft.

Here's the editing process on that....


See you tomorrow!