Friday, October 31, 2014

Spoooooky Ride

Well it kinda was...

Tonight I decided I was going to go out and take some awesome night photos of the Bridgers. So I got in my car, all gear packed and ready, and set off down the road. And then, about 2 minutes later, was back at home rushing to get my bike and gear. I realized that just doing some land scape photos wouldn't be all that fun, but riding down a super sketching trail at night by myself would be oh so entertaining.

The steep trail on the M is, well, steep. Not unridable by any means, but when it's dark and your head lamp is barely working...it's rather interesting. But oh, is it fun. I'm going to have to do a night ride again soon....

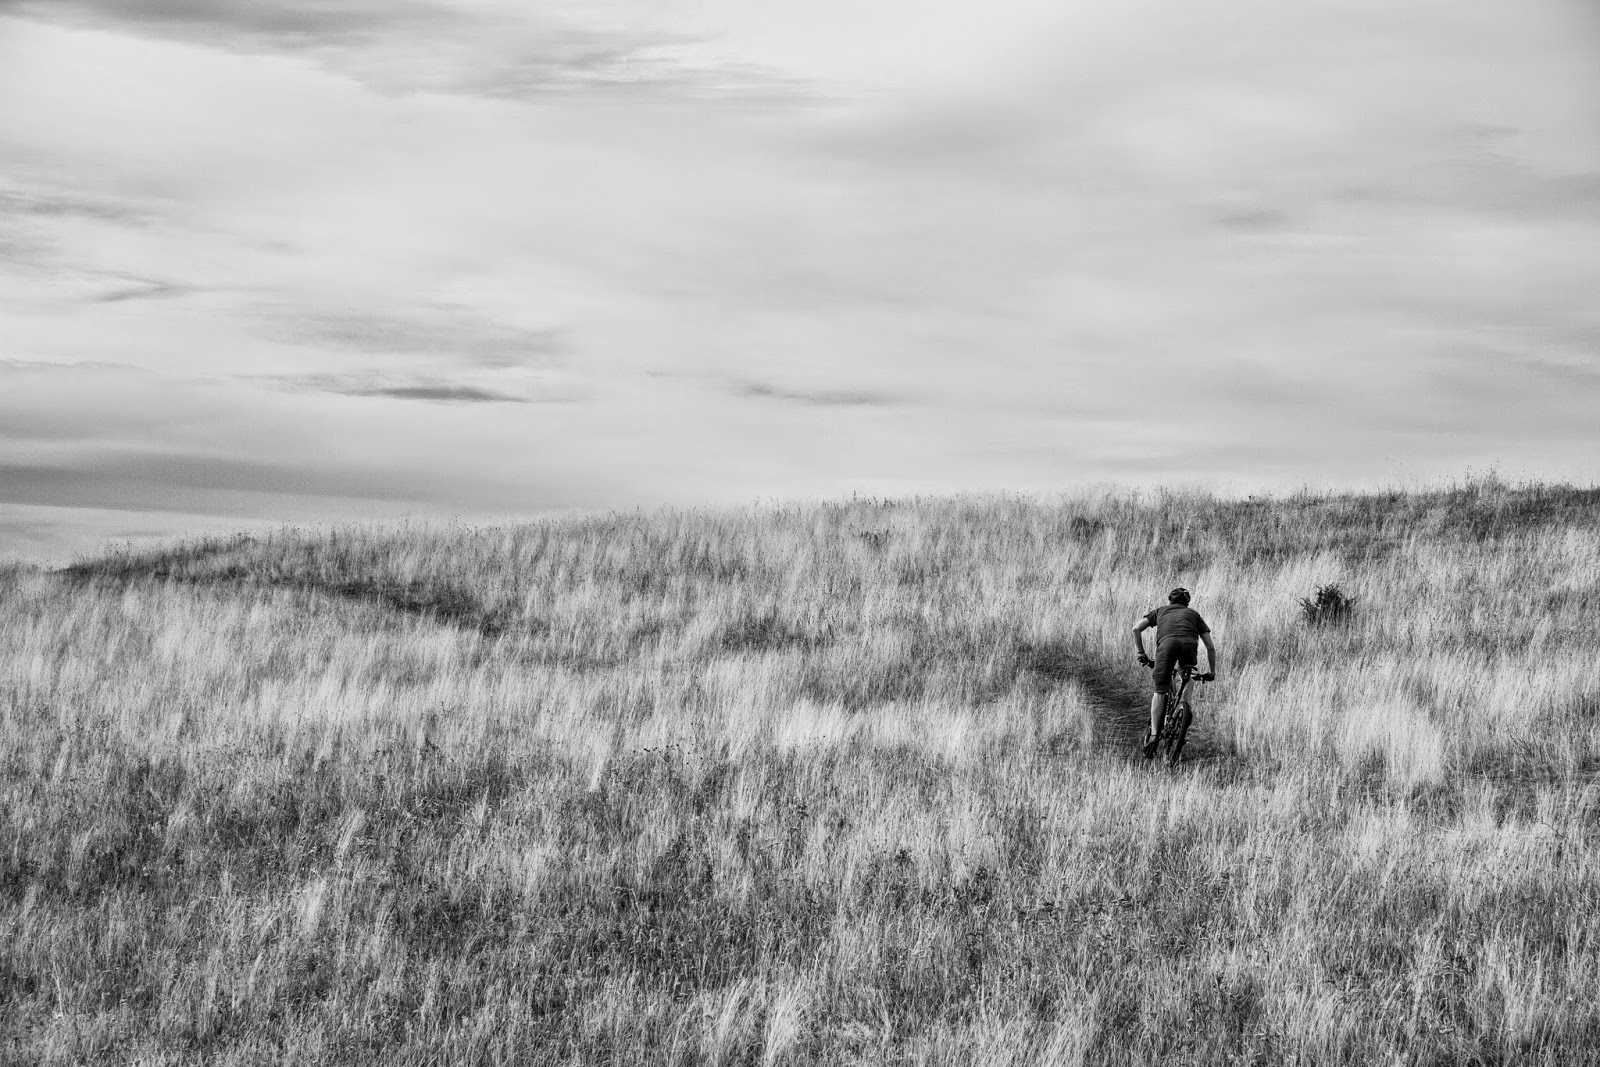
Basically, I walked up the trail to a spot where there's nice curves so the light trail goes across the frame a couple times, and when the sky line is good. The spot I picked was just perfect. The trail does a zig zag in the frame, with a nice little rock garden in the lower right corner for me to ride through. And even better, the hills in the background point right toward where I'm going to be riding! So perfect.

Now...how the crap do I capture me in the frame? I have no remote release that I can trigger while riding...and doing a burst shot like last time isn't going to work....

Well, the answer is quite simple, just a long exposure! I have to anyway to get the stars in the shot, and to get the light trail I want, and to get light on the ground. I did a first test shot at 30s, ISO800, and f3.5. It was about perfect! The ground was a little under exposed, but since I'd be adding light with my head lamp, I thought that would probably be good enough. The stars were there just like they should, so I was happy.

I put my intervelometer on, and set it to a delay of 1 minute. This gave me some time to hike up the trail a bit. I also set the camera to bulb, and set my exposure time to be 1 minute at ISO400. This would give me the same exposure as 30s at ISO800, only I would have more time to ride and there would also be less noise. Good trade off.

It worked perfectly on the first try. Which left me with two options. 1) Leave, never to return again. 2) Try to do a freeze frame with strobes to composite in.

Naturally, I chose door 2.

Figuring cross lighting would probably work out the best, I set up two strobes. Here's a picture of what that looked like. The top left is set to 1/4 power and has a grid on it to constrict the light a bit to just where I'm riding. The bottom is at 1/16 and zoomed to 105mm, also to contract the light. I didn't want to light anything other than myself, which would go along with the lighting that already was happening with the head lamp.


To sync, I used my old trigger and good old fashion optical slaves. My theory was that I could hit the trigger my biting it, which would set off the lower flash, which would then trigger the top flash to go off. And you know what, it worked damn darn near perfect. The only problem I ran into was that I kept trigger it while I was concentrating riding and not running into my camera!

For editing, I literally didn't do a thing to the image. Except b/w. but that's it. #nofilter <----no. just no.

In Ps, I just painted a little mask over me for the riding shot, then put it on top of the light trail shot. Easy as cake, and even the light trails from my head lamp matched up! Here's a little picture of the mask I made, just so you can see what's going on.


Happy Halloween! See you tomorrow!


Medium Format Madness


Wow...what a night...I had such plans for doing other homework, relaxing, reading, even sleeping. But no....the Leaf had other plans for me.

I shot my final "regular" assignment tonight for my photo class. It's a still life, and I chose to do it digitally. My idea was to photograph some of the things I keep in my pocket. We turn in three photos, and there just happened to be three things in my right pocket. Perfect.

When I say I chose to do it digitally, I shot it with a Mamiya Leaf Aptus medium format back. Super expensive back, like thousands and thousands of dollars. Plus, it attaches to a Toyo view camera with a special ground glass only for that back, which is an other couple thousand....scary they trust me with this stuff...

Anyway, heres some videos of the photo process. I'm probably just going let them upload while I sleep, and then post this in the morning.


Here's the photo of the day..


And here's the other two from the series. Enjoy!


See you tomorrow!

Wednesday, October 29, 2014

What...is it?

It, is a me! Actually, it's about 5 seconds of me and a Maglite.

A few day's ago, I read an article on a photographer that did a lot of self portraiture. Some of the photos they did were longer exposures, so the their faces were really, really blurry. I really like them though, it's playing with the idea of self and who we see ourselves as. I interpreted it that we are always changing, never are we static. There may be the general outline of us, but you can never pin point exactly who someone is.

So tonight, I just played with that idea, as well as just having a lot of fun with my flashlight. The first attempts were just in my room, with the lights on and about a .5s exposure. The photos were pretty decent, I definitely got the blurring effect I wanted. But they were flat and a little boring really. Something needed to happen with the lighting to make them more...me. I don't like flat lighting, there has to be some drama in things.

So what did I do? I turned out the lights, stopped down to f10 and 5 seconds, and then used my Maglite. I just pointed it at my face, and then moved it around during the 5 seconds. Nothing precise, just playing. The very first picture I took was the one I eventually settled on using tonight. For some reason, this ends up happening a lot. The first pictures you take end up having that "something" that makes them great.

For editing, I did exactly two things. Raise the clarity all the way. yay contrast! Then I took out the blacks and did the "modern" look. Keeping the contrast the same down until about zone 2 or 3, then not letting it get any darker. When I zones, I'm talking about zones of light brightness. Zone 0 is black, zone 10 is white. It's a way of helping to calculate exposure, but also talking about different tones.

Well I guess that's about it....quick post tonight. Enjoy


See you tomorrow!

Tuesday, October 28, 2014

Shadows to Come

So I'm sitting in my room, thinking. What to do for today's photo...what to do...then I realize, I've already shot today's photo!

This morning, I finished off a roll of Porta 160 35mm color film. Then I had it developed while I was at work. I can use the photos from this morning, and since they're developed already, just scan and edit them and then use them for the blog!

As I looked through the negatives,  one caught my eye. It was of the morning light coming through the windows, and shining down on my bike. It was just a little bit of light, and only the bike got lit up. Sort of a spot light if you will. But it made some really awesome shadows on the wall. I only had two shots left at that point, and I wish I could have taken more. But I really like two that I could take.

The first one is the one I'll use for the blog today. It's shooting down the bike, looking at the far wall where the front end of the bike is projected. It's mostly about the helmet, but the photo makes you eye dance around a bit. The lightest part is the wall, so you look there first, then the bars because they're big, then you notice the lock and wheel that's in focus, and then finally the shadows of the wheel down in the corner. It's just a game your eye places.

I shot at f1.8, and the camera was set to auto so I dunno what the shutter was. Probably 1/250 or something like that?

I won't really go into scanning, since that's not something that a lot of people do, and it's fairly specific to the particular scanner. The scanner I used was a Flextight X, which is a 15k scanner or something ridiculous like that. It's the schools....

Anyway, once I got into photoshop, I started off by cropping the image down a bit. I wanted to get a little lighter on the shadow. Then I added a color balance layer to correct a bit. I cooled the yellows down, and added more cyan and magenta. Gave it more of a daylight look. Buuuuut it didn't look quite right yet. Next was a levels adjustment, I increased the contrast on both ends, then lightened the shadows just a touch. Not much. Curves was next, I did a massive increase on contrast, but only applied it to the shadows part and the helmet by way of layer masks. I wanted those areas to be, well, more contrasty and to draw more attention. With a selective color adjustment, I darkened the mid tone greys, as well as the whites. Gave it a little darker feeling, if you will. Then I decided I didn't like it in color, so I converted to b/w. Darkened the blues and lightened the yellows. This lightened the parts that were hit by the sun, and darkened the shadows. Shadows are blue, and the sun in the morning is yellowish. Finally,  a little curves layer lightened up the bright whites. I like having full white.

I guess the real finally was dusting, since it's a film scan. This was just going through with the clone tool and clicking on all the dust spots. Something a first grader could do...

Cropped a little tighter...and done! I think this is my first analog photo I've done for the blog. The picture I took of a print doesn't count.....


See you tomorrow!

Almost Halloween

and you know what that means...pumpkin carving!

I picked up a pumpkin this weekend, and I had a bit of time today, so I decided it'd make a perfect photo of the day to carve it. It didn't take too long to shape it up, the hardest part was not having a good carving knife! Plus the pumpkin's a little old already, and dying out :( I hope it lasts until this weekend!

Once I had it all nice a perfect, out to the cold October night I went, with only a glowing pumpkin to light my way. Well, that and a headlamp...and strobes.

First things first, I had to figure out the correct exposure for the pumpkin it's self. The glow inside was crucial to get right. I started out just guessing at f4 and half a second, which was pretty dang close. The "correct" exposure turned out to be f4 and 1 second, so just one stop off the money.

Now I have the internal of the pumpkin all lit, the outside needed some light. Perfect for a strobe. I put the pumpkin on a black cloth to have the background less distracting, then also put a grid on the strobe to only let light on to the pumpkin. Grids constrict light. This light I put up and to the right, just out of the frame. I got it as close as possible, so that I could use a lower power, and also have a larger ratio between the pumpkin and the background.

I'll explain it this way, shine a light across the yard, and the lawn chair and table will be lit evenly. In relation to the light source, they're almost on the same plane. The distance between the two is negligible in terms of the amount of light hitting them. Now, get right up with the chair, and shine the light in the same direction. The chair will be really really lit up, and the table will be dark compared to it. This has to do with the inverse square law, which says that if you double the distance, you quarter the amount of light. It works in powers of 2.

In our first case the chair and table are say, 28 and 32 feet away. For the sake of the example, correct exposure will be at 2 ft. So at 28 ft, you lose 3.8ish stops of light, at 32ft, you lose 4. That's barely anything, most people would not notice a difference at all.

For case two, we are 1 ft away from the chair. If the chair is properly lit, then the table is 1/8 as bright. It's 4 times the distance away from the light the chair is, so it gets 8 times less light.

Back to this photo tonight, the closer I got the light to the pumpkin, the darker the background would be in relation to the pumpkin. Which I wanted.

Moving on...

The second light was in the back left zoomed in and at a very low power. This light was just to light up the fog, and to put a little specular highlight on the pumpkin. I gelled it orange, so the highlight would blend in a  bit better. Fog is best lit behind, so the light is about a foot back from the plane of the fog.

For shooting this, I used a remote trigger, so I could put some fog on the scene, and also pop the camera. And then I just went crazy. Fog everything, lights flashing, more fog, running out of fog, more pictures, more fog, picture, picture, picture.

Essentially, I just got a bunch of pictures of fog in different places.


When I got them into Lr, I did some basic edits first. On the face of the pumpkin, I brightened it a bit, and softened/lightened the shadows. This just gave it a happier feeling, not as crunchy as it was before. Then for the smoke, I increased the clarity a bit to give it more crunch.

On to Ps. I first found my base layer I liked. This had the most awesome smoke in it that I could layer other smoke effect on. The other layers were set to lighten, and black layer masks were applied. This step was to ready the layers so that I could just paint in where I wanted more smoke. Which is exactly what I did. Just paint where I want more, and black where I want less. Easy as pumpkin pie.

Then in Lr again, I did a little bit of a desaturate on the smoke, to make the blending go a bit better. The colors were off for some reason, which I really don't like. I also raised the clarity and highlights on the smoke, just to make it pop more. Finally, a little vignette was added. Perfecto.


See you tomorrow!

Sunday, October 26, 2014

Finally feeling like October

Around 1:30 today, I texted Drew to see if he wanted to go out and shoot some biking pictures. Probably just for an hour out by Peat Hill, nothing too special. But his text back was that he was riding Leverage at 2, so I packed up quickly and headed out to the trails.

Annnnnd it was raining when we left the house :( Then on the way out it cleared up :) Then at the trail head, it started snowing :D

So I started playing this game on the way up....while Drew and Bryce rode up, I sprinted ahead of them, set up a shot, shot them as they rode past, then repeated the cycle. All while snow was steadily falling harder and harder. Wonderful photo conditions. Just wonderful. Drew hammed it up for the camera, and I got some great photos of him cranking up the trail.

But the best photo was actually his idea. About midway up the trail, there's a clear patch on top of a hill that looks out over Gallatin Valley. We all got up on top, and I thought it might be nice to get a shot of Drew riding up. But then Drew suggested that I get on top of the hill and look down the trail, getting it snaking it's way up the hill and the valley in the background.

So I got up there, and had the guys ride up. Unfortunately, they were paced out quite a bit...which wasn't what I was really looking for. But...that could be fixed. I just held the camera in the same stop for the length of both riders to pass from the frame, taking pictures every little bit to get them both in a variety of spots.

I shot at ISO400, f4.5 and 1/800. I had been shooting in the forest before that, so I still had the same settings. I could have shot with a higher aperture to get a sharper photo, but f4.5 was good enough. It's still a sharp photo.

Then in editing, I simply took the two rider positions that worked the best together, and then composited them into one frame.

But before that, I did some editing in Lr. This was sort of a night of experimenting with Lr. I did more of the washed out blacks look that is so popular as of late. Not very realistic, but I do like how it looks. Essentially, you raise the black point until the darkest blacks are a dark shade of gray. But I kept the whites in there, because I just hate to have photos that don't have whites. It used to be photos with out blacks, but now I like bright photos. Maybe I'll eventually level out.

To start off the edit, I converted to b/w. Then I went into the tone curve and did some adjustments. Rising the blacks a bit, then darkening the shadows just to improve contrast a bit. For the whites, I upped them a littttttle bit. Not much. On to the general adjustments, I upped the contrast a bit. Funny, because I could have done that in the tone curve, but whateverrrr. Then the highlights down a bit, and the whites. This gave a little more detail to the highlights. Then clarity a bit. More contrast in the mid tones.

For compositing the riders, I chose two frames that put them on the upper portion of the trail, closer to the viewer. If they were in the back, the view would become the subject, not the riders. It would be a cool photo, but I wanted the riders to be the subject. So, just using layer masks, I painted the two riders in when I wanted. To be precise, I layered a photo of Drew over one of Bryce, then painted white on a black layer mask where Drew was to show up. I hope that made sense....


This was my favorite photo of the day...but there was one other I really liked. I feel that it just captured the day, and of biking in general. Just sitting on a bike, in the forest, in the snow, staring at the hills you're about to rip through.


See you tomorrow!

Saturday, October 25, 2014

Fuzzy Buzzy

Why the title? I honestly couldn't tell you....

Other than it has to do with a little mini quadcopter I have and that I used to make the light trails for this photo.

That's pretty much the idea I had for the photo. Just wanted to use the little copter for some kind of photo, but didn't really know what that photo may be.

Once the batter was charged, I just went out to the living room and thought about life for a minute or two. I decided, based on my pondering, that the hallway would probably be the ideal place for the light trails of the copter. There's two blue and two red LEDs on the copter, which would be perfect for doing light trails.

On went the 10mm, and I started to figure out what exposure I wanted. The longer the better for light trails, but the more light pollution I'd get from other lights in the house and even from out side...I settled on shooting at f5.6 for 25s at ISO100. This gave me an under exposed hallway full of BEAUTIFUL color, and then some awesome light trails going on.

When I say beautiful color, I mean like rainbow sorbet exploded on the walls. It's full of rich, deep oranges, purples, and golds. I looooove it.

Just happened to work out so well.

I did three exposures with all the doors closed. There was a little cold light leaking in from around the doorways, but most of the light came from the copter. Blue+red=purple. So the hall way was mostly purple with splashes of gold around.

Then Alex came walking down the hall and opened the bathroom door for just a second. Which turned out to be perfect. Just perfect.

I got gold, pure golden, light flooding the hall way. Combined with the purples, the tones created are just amazing. Especially on the floor. It brings out the smooth, yet textured filled wood in this glow.

As far as flying the coper, I did one shot where it was on the ground mostly, one where it was everywhere, and one where it was very close to the far wall and to the camera. These three covered the whole hallway, and gave the most light trails possible.

Editing, was pretty fun :)

I experimented around with Camera Calibration a bit, setting it to Landscape, instead of the standard that the camera imports to Lr as. This setting punched the light trails a bit, and made the colors more vidid as well as upping the contrast a bit. I furthered this by just upping the clarity a bit....just a bit.

Then in Ps, I combined all the layers with the lighten blending mode. But the open doorway shot was taking over everything! Never fear though, layer masks came to the rescue! I first made a black mask, so nothing would come through. Then I started to paint in little areas I wanted. First just around the door, to get that golden light I wanted. Then on the floor in front of the door, then on the wall, then the ceiling. I didn't paint a lot, just little areas that add contrast and color. Little details are what make a photo really pop, so I didn't need to do much.

Here's all the individual photos, so you can see how the process worked.


See you tomorrow!

Friday, October 24, 2014

Nice, Rice!

My parents got me a rice cooker for my birthday, and I just got it in the mail a little while ago. I haven't used it yet though, in fact I just unpacked it today. But I'm very excited to use it! You can cook rice in the lower part, and then use the top for steaming veggies or fish or chicken, or whatever really! Going to eating a lot of nice rice dishes in the near future...

How to photograph a rice cooker? Well, I started off like most product shots. Light box and two strobes throwing light everywhereeeeeeee. When I look at the product picture on the box, it seems like there were two giant soft boxes that cross lit it. What I mean by this is one light on either side of the cooker, about 45 degrees off center or 90 degrees to each other. This gave nice specular highlights that we'd expect in metal, but with out all the distracting crinkles that a small light would make. The bigger the light, the bigger the reflection of that light, and the cleaner it looks.

For my set up, I had the cooker on a little platform  in the middle, build with a pice of cardboard under the white fabric. This put the cooker up a bit, and made some wonderful little creases in the fabric. It also allowed me to shoot the cooker from directly on.

The two lighter were in the set up previously described, at a mid power of 1/16 and shooting at f5.6.  This gave the cooker a good all around illumination, while really exposing the background into white.

However, in editing, I changed this a bit. While just playing around, I made a vignette around the cooker that darkened the background. I initially wanted to darken the middle of the cooker a bit, but I really, really liked how the background became this soft glow around the cooker. Just lovely. I made the vignette decrease sharpness a ton, as well as exposure, shadows, and clarity a bit. Then I raised contrast and highlights a lot. This accomplished the soft glow I was talking about. It's hard to describe, so you can just look and hopefully you'll get what I'm saying. Here's a before and after the vignette effect.


See you tomorrow!

Thursday, October 23, 2014

Sun Be Gone

If you didn't know, there was a partial solar eclipse today from about 3-5 MST. I only found out about it maybe an hour before hand, and sadly I had class the whole time it was going. So then, how did I manage to shoot the eclipse? :)

Skip a few steps, and I'm in my backyard, eating a banana, and waiting until the clouds clear a bit to shoot the sun. Or rather the part of the sun I can see. I figured that it would be best to shoot through some trees, just to give some texture and dimension to the image. I would rather shoot it at sunset with a really long lens just as it's dipping below the horizon...but I don't have a really long lens and the eclipse is two hours off.

So I made do.

The exposure for this one is a little tricky. Stop down all the way, shoot at the lowest ISO, and use  the fastest shutter speed. The sun is $@^&* bright....

Not really much to say on that...if the sun is behind some clouds, that can help darken it a bit. Preferably, you'd use a solar filter and probably an ND filter or two. But I don't have those for my telephoto lens. Maybe next time.

For the composition, I couldn't really look through the view finder very well (it's still really really really bright) so I roughly lined up and used a shot gun approach. Shoot a ton of photos while moving around a little bit to get slightly different compositions, and one will turn out. I think you can get really cool photos like that. Also, you could use the depth of field preview button, which stops to the aperture you want to preview what it will look like. In this case, I'd be at f45, so it'd probably make it dark enough to look through. Maybe. But being me I didn't think of this until 5 seconds ago so I didn't use it today. Oh well.

Editing...editing, editing. Step one, convert to b/w. There's no color anyway, you're shooting the sky and are too stopped down to get anything other than white light from the sun. Step 2: up the mid tone contrast a bit to get more details in there. It can get a little washed from the MASSIVE lens flares going on. Finally, crop a bit to you liking. I put the sun in the upper right, as there's a cool branch that goes along the middle.


See you tomorrow!


Lamp

Had a late night of training tonight, so I didn't even get home until midnightish...and still had no picture. :(

But then, I saw the light....no literally, I saw my lamp reflected in one of my lenses. It was an old Nikon Series E lens....yeah not sure if that's relevant. But it's a telephoto zoom lens, which is important! 

It's important because there are lots of elements and lens in side, which make lots of really cool reflections. :D

I just used my phone to take the picture, it's quick and easy and seemed to be fitting. Using a cheap cell phone to take a picture of a nice expensive lens....

And then editing it in Snapseed of course!

I didn't do much with editing really. I started by cropping everything so that it was just the lens and not any background. Then I increased the contrast just a bit to get rid of some unwanted shadow details. The subject is the reflections, so I want to draw as much attention to that as possible. To further this, I increased the saturation  a tad. More color against black equals more allure. 

To finish it off, I added a center blur with slight vignetting. The ended reflections were already blurred, so all it did was blur the lens to draw attention into the frame instead of out of it. If that makes sense....


See you tomorrow!

Tuesday, October 21, 2014

Yum Yums Mark IV

I think it's the fourth, maybe it's more than that... yum yuma seems to be a popular title of mine.

Any way, when my dad was in town this weekend, I made some epic bars for hiking and just eating in general. Since I spent a lot of time this summer photographing things for my sister, I thought why not photograph my bars for a change!

The set up was a little different than what I've done in the past. In the light box, I had one strobe pointed back as usual, but then I had a soft box on the other side very close and pointed down at the bars. This gave a nice backlight, but also a nice soft light on one side of the bars. There's not much fill, just what's bouncing around in the box. But that's more enough to give detail to the shadows.

As far as the positioning went....I'm still not sure if I'm really happy with it...there's the banana and Nutella in the background, but it's too weighted on the right. At least that's what it feels like. But maybe it's just me. Also, the horizon is a bit skewed...grrr. But I like the bar positioning! Three things always works much better than just two or four. Even numbers don't look good.

Editing was minimal on this one, as is the common trend as of late. Jut a little clarity bump on everything but the bars, then a shadows lift. On the bars, I just toned the highlights down a bit. To get so that there was clarity up on everything but the bars, I raised the overall clarity, then did a local adjustment to bring down the clarity the same amount I raised it.

Gosh, I guess there's not much more to say...

Oh, I shot at 1/200, f10 (for greater depth of field), and ISO100. Lights were at 1/8 and 1/32.


Okay, so I chose another photo...I like it better with out the Nutella in the background, but otherwise it's exactly the same. Like, exactly the same edits and everything. However, this was shot at f16 for greater depth of field (you can tell more is in focus) and so the lights were both brought up one stop to compensate. A smaller aperture cuts out more light, and so you need to bring more in...obviously. I also cropped this one long a skinny, which I think really helps. I like odd aspect ratios like that.


As for the recipe:

3 banana
1/2 cup peanut butter and nutella
1/2 cup protein power or rice flour
1/2 cup dates
A bunch of chopped dates, flax seed, and chia seeds (as much as you want)
2 cups oats
A pot load of honey (add more for thicker consistency

Mix that all together in a bowl (I used a potato masher :D)

Spread in container of choice, and then top with more dates and seeds. Or if you're feeling crazy, put PB or Nutella on top too! Or jam...ohhh that's a good idea....hold on I need to go make something real quick...

See you tomorrow!

Glittering Water Jar Thingy

So long story short, I ended up with a fish tank full of water and glitter on the kitchen table tonight... oh and there was a mason jar with water and glitter in it too that I was madly shaking and taking upside down pictures of under water.

It was an interesting evening...

Let's back track a bit and give some set up history.

Step 1: Get a fish tank...I got a 20gallon, but smaller would be fine too.
Step 2: Put tank in light cube box thing. (the white box used for product photography
Step 3: Fill tank with water
Step 4: Acquire glitter and mason jar
Step 5: Fill jar with glitter and water. Mixture up to you.
Step 6: Set up two speed light pointing at the back and sides of the light box. This turns it into one giant light source, which you  need.
Step 7: Photograph away!


Quick picture of the set up. This is from the view of the camera. You can see how the bottom of the water layer thingy (meniscus?) reflects the light and turns into one giant mirror. I shot up at this, and used it to create a surreal back drop/setting for my glitter jar.

For shooting, I had the camera on a tripod to keep it aimed at the same place for consistency at least on that scale. Then I shook the jar a lot to get the glitter going, then quickly tried to put the jar in the water where the focus plane was. Most times I was unlucky, but I got some good shots out of it. It comes down to half luck and half skill, you need to sacrifice accuracy on jar placement over speed to catch the glitter before it settles. It's a balance.

For settings, I shot at f/5.6 to keep the background nice and smooth, then at 1/200 to kill ambient light. The strobes were at 1/16 power, so way up there for that f stop. But they're bouncing and going through water so it worked out I guess.

That's about it for shooting thoughts....I guess it wasn't as complicated as I thought! Just setting it up took a long time!

Editing was really simple. The lighting was almost spot on, so I just tweaked a few things and it was good. Cropping and rotation was a big thing though, I picked the angles that put the jar in an orientation that didn't really make sense given the surroundings. I like the effects. I mostly just did a little clarity and shadows adjustment, nothing much other than that.

Here's my favorite one, and the rest come at the end.


See you tomorrow!


Sunday, October 19, 2014

Little Mountain

My dad and I hiked up Sacagawea this after noon, and boy did we get better weather than when I hiked it a few weeks ago. The wind didn't really start blowing until we got up to the saddle, and even then it wasn't nearly as cold as before. There wasn't a cloud in the sky, and you could see for miles and miles around. In places there was still snow from last week, and even a couple skiers trying to get early season runs in.

Up at the top, we sat and enjoyed the view for a bit, munching on the bars I made last night and some left over pizza. Yum Yum.

Then I got the camera out, and shot a little planet photo. Sacagawea is the highest peak in the Bridgers, so I figured it'd be a great spot for a little planet. Especially since we were on a ridge sort of deal, so it would look like the planet was divided in half.

I didn't do any HDR though this time. Crazy, I know. Not even black and white either...wohhh. Who is this guy?

I just wanted a simple, natural, photo....granted, one that has been warped and manipulated a ton to create a 360 stereographic image, but still.

To get the natural look, I just took photos. No fancy stuff, just ISO100, f/11 and 1/250. It's the sunny 16 rule. Only instead of shooting at f/16 (one stop darker than f/11), I shot at f/11 and then quickened my shutter by one stop to 1/250. The sunny 16 rule is to shoot at f/16 and then the closes shutter speed to your ISO speed. So if I was at ISO200, I'd shoot at 1/250. ISO50, 1/60 of a second. Pretty simple. It works for any bright and sunny day. You'll get the widest tonal range as possible. Every thing from dark darks, to bright whites.

As usual with little planet photos, I shot on a very, very level tripod, and overlapped a ton. In editing, I did a few little shadow adjustments at first to get some detail in them, then moved over to PTGui. However, I had too much overlap in shooting, so I only used every other photo. This just helped cut down on misaligned images. There were still some, but I don't have time to go in and manually re-do 100 points. It's good as it is.

I then went into Ps and filled in the hole in the center where there was no photo. I did this with a fairly hard stamp tool. If it's too soft, you begin to see blurriness in the rocks. It's happening a bit right now, but not too bad.

Didn't do anything else in Lr after that.


See you tomorrow!

Saturday, October 18, 2014

The Mountains

Super short post today, just not much to say! It's a simple photo, with a very simple edit. Simple simple.

My dad's in town for the weekend, and tonight we went for a short hike up the M trail at sunset, and what a sunset. Not one of those epic cloud ones, but a simple, pure, sunset. Crystal clear sky, and a perfect view all the way to the mountains in the west. In the mountains all the way over there, there was a bit of moisture in the air. I say this because their were some epic sun rays going on as soon as the sun set.

But it didn't last for long, so even though we were only a few minutes from the top, I stopped and took a couple pictures. Sometimes, it's good to wait a few minters at sunset for the light to get better, but sometimes you just gotta take the picture when you see it!

A "proper" exposure blew the sky out completely. It's the camera trying to not have super underexposed blacks of the mountains. But you know what, I want that, and I want there to be an awesome sky. So I underexposed by one stop, which brought back the sky into perfect exposure.

I zoomed all the way in, and just got the silhouette of the mountains and the sunset behind them. Simple, but perfect.

For editing, I upped the clarity and highlights just a bit. Not much. This is basically how it looked on the camera. Probably not so much in real life, but close as I could get it.


See you tomorrow!

Friday, October 17, 2014

Alex and His Mom

Wasn't sure what I was going to shoot tonight, but then Alex's mom wanted to get a shot of her and her son, so I jumped at the chance to get them a good portrait and get my blog out of the way at the same time!

Unfortunately, it was horrible lighting. Just after sunset, during blue hour. Which can be great actually, but I think they wanted more warm tones, especially since the backyard has some awesome colors in it. So what did I do? I made my own little patch of sunlight of course!

I stuck a strobe up really high (8ft) and pointed it down into the bushes behind the scene. I also gelled it a light orange color to mimic the later afternoon sun. It's not perfect, but at the angle it was it threw some nice shadows and awesome sunlike highlights. Plus, it gave a wonderful side light on Alex and his mom's face, which really helps sell everything.

As for lighting the people, I used a strobe with a warmish gel on it and an umbrella just to camera left of the people, and a reflector just to camera right. This gave the softest light I could, while also being a little warmer. Maybe the light is reflecting off a shiny window or something? That's kind of what I'm going for. This strobe was at 1/16 power I think, and I was shooting at f3.2. The background light was at 1/8 power. Very bright, like the sun!

For exposure, I under exposed the background by two stops. This gave me a really nice base of cool, late evening tones to work with and to build my light around. Effectively, I've split toned the image. By shooting in blue hour, I've made all the shadows blueish, and then brought in warm light for the highlights and subject. I shot at 1/15 of a second, so there's a little bit of blurring going on in the background and around their faces, which helps soften things a bit.

For editing, I did two vignettes that were opposite of each other, kinda. One was to brighten up the faces, and one was to darken the edges. For the face one, I bumped the exposure, highlights, and shadows a bit. Not much. Then I made a local adjustment and did that again, as well as reducing the clarity on their skin to give it a smoother look. I couldn't get as soft a light as I wanted, so post had to do to make that happen. For the edge darkening, I raised the contrast, lowered the shadows, and upped the saturation. Standard vignette plus adding in a bit of color.

That's it folks, really quick portrait, but I think with really good results! If I could get more lights to soften up their faces a bit, that would be nice, but I only had the two. Maybe next time!


See you tomorrow!

Thursday, October 16, 2014

Ground of Glass

I spent the evening shooting portraits with Matt and a couple of 4x5 cameras. Between us, we only shot 20 frames in 4 hours... it's a realllllly slow process.

But for some reason I didn't get board, and we didn't start to slack off at all! I can think of a few reasons...

First, even though it's slow, shooting with a 4x5 is very deliberate. Every, absolutely everything, you do has to have a purpose and has to be thought out. There's no winging it and then chimping (looking at the back of the camera) to see what you did wrong. It has be right the first time. So there's an element of purpose or pressure or something in there, making all the mental calculations, trying to visualize the lighting, all that.

Speaking of lighting, that was a major challenge, and quite entertaining. We used a mixture of hot and stone lighting, which had to be metered independently and then combined together. First, I usually did the strobe metering, this is because it will dictate what the f stop will be, and from there you set your shutter speed for the hot lights. Remember, strobes don't care what you shutter does. They only care about your ISO and aperture.

So say I got a reading of f16 for the strobe. That mean at f16, the strobe will properly expose the subject where I took the reading. But then say I have two hot lights behind me, only lighting my hair, and the opposite side of my face. How do I meter for those so that they are equal to the strobe? You set your aperture to f16, not fire the strobe, and then the meter will tell you the shutter. Easy as pie, or is it cake?

This is all beside the point though...because the photo for tonight is not from the 4x5, it's from my phone. It's taken of the ground glass, which is the back glass on the camera where you compose the image before you put the film holder in. I had two hot lights on either side of Matt for the picture we were taking, and I just decided that I wanted to get a picture of what I saw. My phone did an excellent job...

of making a terrible photo. True, it was horrible light conditions, but still, that phone is not sharp at allllll. It shot a ISO2000 for crying out loud.

But anyway, I had a photo that I liked. On to editing, in Snapseed of course. First things first, get all the color out in an attempt to hide the noise. SO much noise. B/w helped a bit. Then I did my normal edits, ambience up, shadows up, contrast up a bit, just overall try to improve the tonal range and the details that got lost in dark shadow or bright highlights. Not too much I could pull out though, since it's a compressed jpeg and not great to begin with.

Then I just said screw it, and went crazy. I went full HDR on it, which destroyed the quality. But oh well! Then to got further, I did a center blur and vignetting a bit, also cropping things down a ton. It's probably half the size as the original.

To put the final touches on it, I used the shuffle mode in Retrolux filter to get some crazy light leaks and what not going on. Just gave me a few different looks that I liked.

Finally, in Ps, I put all four versions I created onto one photo, so you can see them all at once.


See you tomorrow!

Wednesday, October 15, 2014

Lighting a Window

Window light is really something special. North windows are the best, but at midday, a western or eastern widow will do in a pinch. Essentially, windows are just one giant light source, and much much cheaper than a big soft box or strip light. North windows (in the northern hemisphere) get the most indirect sunlight, and thus have the softest light. Not quite as soft as a big soft box up close, but pretty dang good.

And when you combine strobes in with them, you can make some really awesome stuff happen.

Here's a little video of what I did for lighting today. Thought it'd be easier to show than to tell.


For editing this picture, I started by modifying the contrast a bit. Overall contrast went up a bit, then I shifted the mid tones to be a little brighter as well. Then darkened the blacks a bit. So why do this? As far as adjusting the blacks and whites, I wanted there to be pure white and black. Definitely pure white, otherwise I just feel like photos are flat and ugh. Sometimes it works to not have that, but for a lot there needs to be bright whites.

For the mid tones, I wanted a brighter image. The shadows got a little too dark for me, and I wanted brighter highlights. This was personal preference for me and this specific photo, it's not a hard a fast rule. I generally do my edits off of what my gut feeling are. If I look at a photo and think, I wish that was brighter, or if only that had a little more black there, then I go and do that! It's easy to see that you don't like something about a photo, and it takes only a little work to analyze it and figure out what that is. Then it's a simple matter of changing or fixing it.


See you tomorrow!

Tuesday, October 14, 2014

Tic Tac

Except it's only a tac. Push pin. Whatever you want to call it. Not a tasty morsel of pure sugar. Sadly. But then again if it was, I probably would have eaten it before I got to shoot it...

Anyway, I have this little box of tacs in my room, which I've used in the past for other photo projects. Like the tac shadows I did last year. They are so simple, yet can make all these really awesome complex designs at the same time.

But tonight, I wanted something simple. Very simple.

Macro lens filter thingy was the answer. Shooting at f2 with that thing makes the world go oh so hazy. Everything is incredibly burry, like beyond recognition blurry. Only the millimeter you have in focus is in focus. Quite wonderful for many applications. Like this one.

I set the tac on a white board, and then used my Maglite as the light source. It made kind of a cone or light hitting  the tac, highlighting one side, and plunging the other into shadow.

With a large depth of field, it's not too interesting, I mean sort of...but it's just a picture of a tac...

But now add in the shallow depth of field and you have something much more abstract and moving. You think you know what it is, but you're not quite sure because it's so vague. Form is such an interesting thing to play with. In architecture the angles and light plays and shadows are wonderful. In macro imagery, it's the shallow depth of field you get and crazy things you can make with it.


For the final image, I shot at f2, ISO200, and then whatever the camera wanted for the rest. I shot in Av mode, which is aperture priority. I set the aperture, the camera sets the shutter. Quite nice.

Editing, all did was convert to b/w, and then up the contrast a bit. Just a bit. It's almost straight out of the camera.


See you tomorrow!

Monday, October 13, 2014

Out for a Ride

I had a little time today, and it was nice weather, and my bike was working (mostly), and the trails were pristine...

The trails east of Peat's Hill are super close to town (obviously) and they are actually pretty fun. Not very technical or difficult, but very flowy lots of ups and downs and twists and turns and...cows. But that's beside the point.

The scenery of the trails is just amazing, they're surrounded by farmland, with the mountains off in the distance. The trails surround this little valley, with the autumn colors in full bloom. There's rich reds, yellows, and oranges, all with rich green grass and ribbons of single track winding it's way through.

I chose two locations to shoot today, one up top of the valley, next to the farmland, and one down in the midst of an aspen grove.

The first, and most complicated problem I ran into was timing. I was shooting myself, and my remote trigger was not working very well. That might have had something to do with me trying to trigger it with my teeth while riding....but still, there was a major problem here. Timing can be everything in a photo, so I needed a way to at least get really close.

First idea was to use the self timer...I gave up on that pretty quick. 10 seconds is really hard to judge, and even harder when you need to be in an exact spot at exactly the right time while riding fast. Just not going to happen...

What else could I use to trigger the camera...if only I had a way for it to take a bunch of photos continuously. That way it would get me from when I start to when I stop or shut off the camera, and hopefully the moment in between that I want.

One word, intervelometer. :)

Sadly, the shortest interval it can take is 1s, but it's better than nothing. I also set a delay of 6 seconds so that I could start riding before the pictures started, and a max of 10 pictures because that's really all I needed. I didn't want 30 pictures of me riding back to the camera...that would fill up card fast.

Now that I had my timing figured out (sort of), it was on to framing. The section of trail I wanted had very right framing. To the right was  fence and farmland, which was pretty but I didn't want to include it, and to the left was the valley and then the city in the background. Uhg, no city. So with my horizontal boundaries already in place, I just had to figure out the up and down. Like I talked about yesterday, you should put the horizon on the upper third line if you want to emphasize the foreground. Which I did.

A chance factor that makes the photo, actually the reason why I chose this location, was a little S curve in the trail. It makes a natural place for the eye to focus, and with the biker just at the beginning of it, it leads the eye down the trail and to who knows where. It's trying to evoke that sense of endless trails...just wanting to get over the next hill to see what's coming, and then to the next, and the next, and the next!

I shot at ISO200, f7.1, and 1/250. I wanted a fairly wide depth of field, hence f7.1, and then to get a fast enough shutter to freeze me, I needed to bump the ISO up a bit. Since I was riding directly away from the camera on just that little section of trail, my motion relative to the camera was minimal. If I had just been going right to left, I would have needed to use a much fast shutter to freeze me.

I also used a polarizer to darken the sky a bit. It didn't help much, but it gave that little bit I needed to not have a blown out sky.

Editing for this one was more complete than others recent. I first darkened the sky a bit with a gradient filter. Upping the contrast, darkening the shadows, and upping the clarity help to bring out more detail in the blown out bits. I also lowered the exposure a bit and raised the highlights. This gave me more mid tones, but kept the bright whites.

Now for the foreground. I did the opposite to it. I brightened it up a bit, and added some contrast. Actually, brightened it up a lot, and upped the highlights a ton. It was a pretty flat day, so I need to add the light back. In a perfect world (where I have time), I would have just waited for the light. But I didn't have time,  so post will have to do :(

As for the aspen grove picture, I won't go into details since it's not the photo of the day, but if you really want to know, ask in a comment and I'll write something up. I think the first photo is much better...


See you tomorrow!

Sunday, October 12, 2014

Autumn Sunset


I spent most of the day inside today...studying and watching Netlflix. But I did manage to get out for a run in the afternoon, and the colors were amazinggggg. The late afternoon sunlight was hitting the trees in just the right way, illuminating them like they were glowing.

So I sprinted back home and grabbed my gear. Well, maybe not sprinted because it was, like, two miles away...but still.

As soon as I could, I was on top of Peat's Hill. Lucky timing too, because I hit the last 5 minute window of light before the sun dipped below some clouds and then under the horizon. But before that I managed to get the shot I wanted.

Having only a small amount of time, I relied on my light meter in the camera to set up an exposure. I knew I wanted a low ISO (100) and a sharp photo, so I shot at f16. The shutter speed turned out to be 1/3 of a second.

Little bit about how cameras meter, and how they get tricked. The most common way they get tricked is by very bright objects in the frame. Such as the sun, or snow. Tonight, shooting west there was obviously the sun was directly in the camera. The camera saw the sun and thought, "wohhhhh, that's really bright! I better make everything really dark! :D" no...bad camera. Not it's fault, but you have to take that into account. So tonight, when I took the meter reading, I made sure to have the sun completely out of the frame. I also made sure to put everything in the frame that I was going to shoot, so that the meter would be as accurate as possible.

Shooting on a tripod, keeping everything level. Also, I put the horizon on the top third line. This is usually the most pleasing place to put a horizon when you want to highlight the foreground. When you want the sky, put the horizon on the lower third line.

Editing, merge to panorama in Ps. Then use the stamp tool to rebuild some of the bottom of the frame. With panoramas, there is usually some weird stuff going on the edges of the frame due to warping and lens correction. I wanted the bottom of frame, so I needed to rebuild some of the areas that were empty. It was grass, so simply stamping areas back in was easy enough.

In Lr, I tried to keep it as natural as possible. Just a bit of clarity and shadows up. Just a bitttttt. Then more clarity in the sky and blue tinting to make it more dramatic. Yay. That's all.


See you tomorrow!

Saturday, October 11, 2014

S'more?

So Alex bought a blow torch today....and some marshmallows. and started roasting said marshmallows with said blow torch. They were actually pretty dang good. Didn't have that campfire taste, but it's a lot of sugar so it's delicious.

Of course I had to shoot flaming marshmallows. Which turned out a little more complicated than I thought. Most of the time, you have to shoot at 1/500 or even 1/1500 to get fire without getting it completely over blown.

But tonight, I guess this blow torch sucks...because I ended up having to shoot at 1/10 and ISO400, and f5.6 to get the fire. Whaaaa?

Anyway, once I got my exposure set, it was a simple matter of taking a lot of pictures of marshmallows catching on fire! You can see the set up is pretty simple. As in a marshmallow on a fork above fire....with a black cloth behind it.

Editing, I upped the clarity a bit, as well as the shadows. It's pretty simple edit, this is a fairly true to life photo. As much as a photo can be that is...


See you tomorrow!

Friday, October 10, 2014

Hello, World!

So my internet has been off the last couple days :( The card bounced on our bill for some reason, and then Centurylink decided they were going to be lazy and not give internet back even when we actually paid for it...

But it's back tonight! So I'll attempt to write up the last couple days of photos as best I can remember.

As some of you must know, the other night was a blood moon. This is when the moon falls in the shadow of the Earth, and so the light reflecting off of it is red, like the sunset. It's pretty awesome, and it's really rare so it's a special thing that I don't like to miss.

This weeks blood moon happened at 4AM, so I got up and planned to go shoot somewhere starting about 3:30. Butttttt it was cold out, and I had school that day, so I ended up sitting on my floor with my camera pointing out the window. Which actually worked really well.

I was blessed with a clear night, and the moon came through really clear. However, the double panel window caused some refraction issues, which I needed to solve. Think really really bad lens flares...except that once I threw on a polarizer, everything was better!

Funny story... I had on my 70-300, which has a different filter thread size, so I literally hung the polarizer off the end of my lens...a little untraditional, but it worked!

Exposure was, difficult. It changed based on the stage the moon was in. When it was normal, I was at f11 and 1/60. Really close to sunny 16 rule. A little later, I was at f11 and 1/10, then f5.6 and 1s, then 2 s, then up to 5 seconds at the full blood moon. One thing I messed up on was changing exposures too fast. When the blood moon started, the difference between one side of the moon lit by the sun still, and the dark side was really extensive. I suddenly started exposing for the dark side, and blew out the light side sadly... But oh well. In the future, I'm going to gradually change exposure so that everything still falls within the dynamic range of the camera. In other words, not underexpose or over exposure things. And also so that in sequence shots like I did, there's not abrupt changes.

On to editing. First, I picked out all the shots I wanted. I did a time-lapse, with a shot every 5 minutes, so there were a lot of shots....I picked 6 I liked the most and covered the whole range of what I captured. Then I edited each one to bring out as much detail and fix the over/under exposed parts. Mostly this was done by shadows/highlights adjustments.

Next, I put everything in Ps and set the blending modes to lighten. This let the moons show through the other layers, but since the night sky is black, it turned into one big sequence shot. I had to align the images into a straight line, so it looked like the moon traveled from left to right. I used the ruler feature of Ps to make everything perfectly lined up.

Back in Lr, I raised the clarity (of course) and vibrance a bit. That's all. I tried to keep it looking as natural as possible.


Now for yesterday...what was yesterday...

Ah, yes...my new camera! I just picked up an old Canon AT-1, which is really similar to my AE-1, but different. Not super sure in what ways, but it is. I got it for free too, so I'm not complaining. 

This is the third camera I've photographed, so I changed it up a bit. By light painting! I've only done lighting with strobes in the past, so I need something else. 

Light pairing objects is way to fun. I found this old, weird dome light that I then used to do said painting. Camera got set to 5 second exposures, and I focused on one area each time. I did the lens, the top, the sides, the front, the bottom. etc. Just getting everything lit in different ways that I could then compile in Ps later. The last exposure I did was 15 s, where I just waves the light around a lot and lit the whole camera. A pleasant side effect I wasn't expecting were the reflections in the lens. These awesome multi colored light trails showed up, and so I had to include them in the final image. 

I compiled the different exposures much the same as I did with moon photo. Set everything to lighten, so use layer masks to paint which parts I wanted. Really simple once you get into it. Just takes a little work to get different images to blend well, as you don't want hard lines between layers. 

Back in Lr, I did a little tweak on clarity, just a little. And I also painted out the stand the camera was on by using a adjustment brush set to -4 ev. 


Now for today.

I didn't know what to shoot, so I literally just walked out of my house with my camera and tripod. I ended up on campus, shooting the fall colors as illuminated by street lamps. Wasn't feeling it though, so I moved on.

Then it hit me, what got my into night photography? I thought back, way back, to the beginning of high school when I got my first DSLR. I was staying over at a friends house, and we were gearing up to play Halo all night long. But I had my new camera, and was playing with it. It was dark out, and I had no idea what would happen if I did a 30s exposure, so I held, yes held, the camera for the 30s. 

And was blown away. The world on the camera looked like day, you could see the clouds, the house across the way, the grass. I think that's one of the moments that made me fall in love with cameras. 

So in tribute to that, tonight I pointed by camera straight up in the air and took a 30s exposure. No frills, just a photo. A simple, pure, photo. 

Editing, all I did was b/w with a little clarity and highlight adjustment. Not much. Just, enough.


See you tomorrow!

Tuesday, October 7, 2014

Second Two Face

More playing with strobes tonight. I had some ideas of spreading out the motion blur more, and doing two frozen images on either side of the blur. Like someone moving from one position to another.

My first attempts didn't really prove to be what I wanted them to be. Kind of a washed out blurring thing, and then a lame ghost image. I quickly abandoned that in favor of doing something else.

Next, I tried doing in camera multiple exposures again. Same settings as last night, long exposure and then doing pops with the flash to make each exposure with in the overall exposure. If that makes sense? The background was very dark so there was nothing to fog or go over the exposure. Except for the other exposures. Which was what I was going for. I wanted to just stack exposures over exposures so that it becomes essentially double exposures.

I started doing that with just myself, trying different things like spinning around in a circle, moving back and forth, all that fun stuff. After doing that for a while, I decided that I needed some other people Doing it with just myself was cool and all, but it was just getting old really fast. There's only one face, so it just looks like a blurry picture more than what I was going for.

Then I got Nick and Jay out of the house and to stand in as subjects for me. I had Nick stand in one place, then I popped the strobe, then Jay moved in and I popped the strobe again. This made an exposure of each of them, layered on each other.

I upped the power of the strobe from yesterday to 1/16, and the aperture to f16. This made the ambient darker, higher aperture, but I compensated for this by upping the power of the strobe.

Editing was almost as simple as yesterday. I did goof up while shooting, and didn't look at my histogram again. The image was under exposed by two stops, so I had to correct that in Lr. I would have rather just upped the power in the strobe. I also upped the whites and the shadows.

You gotta love the goofy faces Nick and Jay made, and how wonderfully they blended to make possibly the weirdest portrait of all time.


See you tomorrow! 

Monday, October 6, 2014

Blurry Face Person

I had this idea tonight...a portrait idea. I've tried something like this before I'm sure, but tonight I went a different direction with it.

When I shot the dancers this summer, we did a couple photos where I used motion blur in combination with strobes to create this recreation of motion. It made some really awesome effects, with this flow of color and silky cotton texture surrounding a frozen subject. I wanted to try that sort of thing tonight, except layer the motion on top of the subject. So technically, I'd just be blurring the crap out of my subject. But that's okay. :)

I made a little video for you guys of my process.


To re state, I shot at 5 seconds to get the blur, and f10 to get that shutter speed. If I had been at f2.8 or something like that, my shutter would have been too short and I wouldn't have enough blur. I played around with different levels of strobe lighting, but I found that I liked the low power setting. They froze the edges nicely, but left most of my face to be blended nicely with blur.

For editing, I upped the contrast and went to b/w. That's all. Upped the whites a bit too, but that falls under contrast.


See you tomorrow!