I went up toward Baldy today, not all the way up because it was pretty late in the day, but enough to get an awesome view or two. The whole trail would have taken me at least another hour, which would have put me on the decent at night...not the best idea. So I called it a day where I was and turned around.
After I took a few pictures of course.
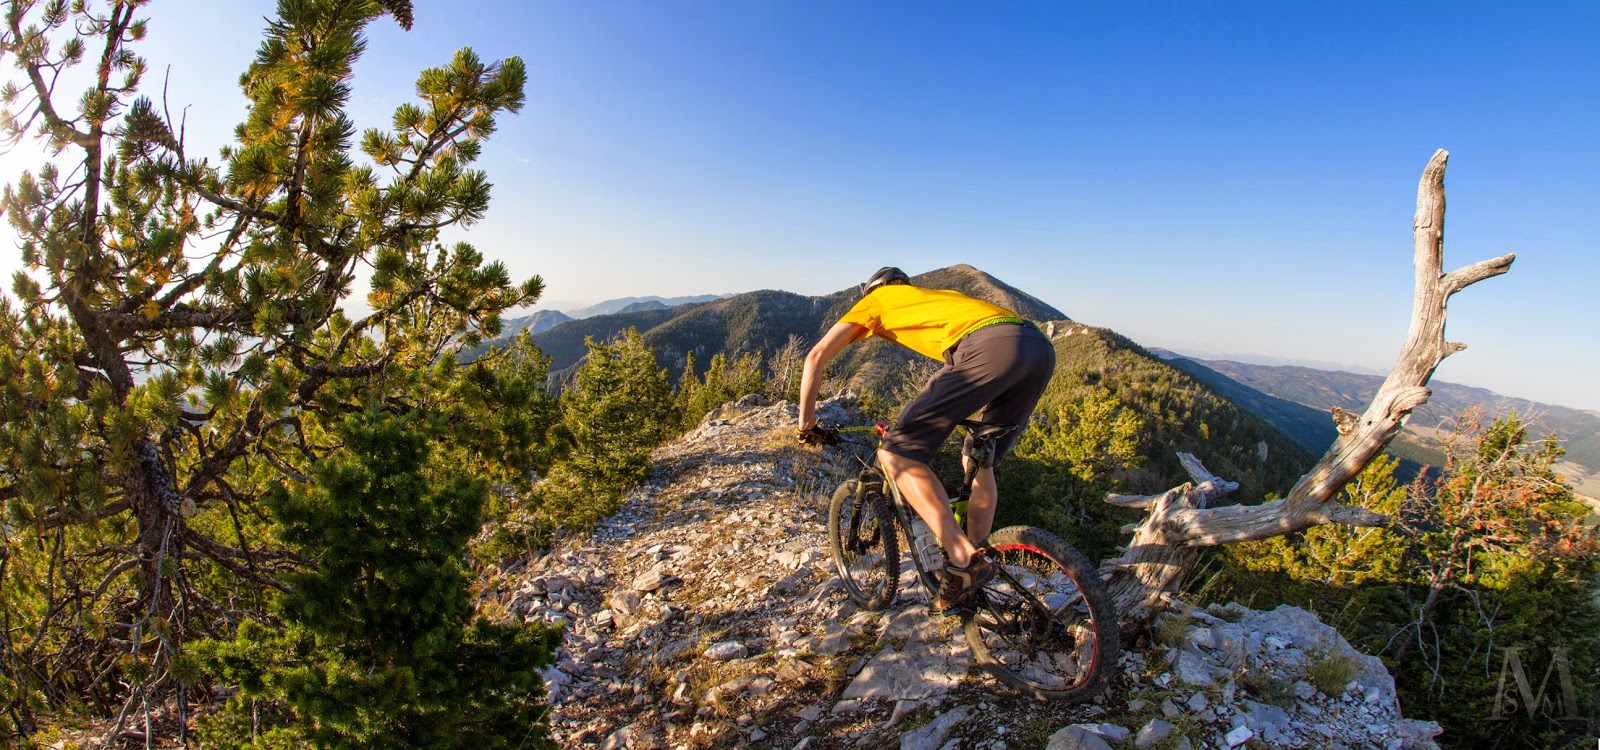
I stopped at an overlook, and there was this cool little rock knoll that sloped down along the ridge. I thought it would just be perfect for a panorama. There was even a little dead tree on the right side to put in the frame!
With photos like this, it's nice to have a foreground element to ground everything. It helps create 3D space, and also really helps frame the photo, keeping everything together. Even though the edge of the frame is farther than the tree, the tree keeps your eye from wondering too far from the center of the image.
I tried out a couple different places for me to ride, but the one I liked the best was just in front of the camera. The distortion from using a 10mm lens really stretched me out, which I think helps add to the depth of the image. Everything is pointing toward the "trail," and then the mountains behind. I was a little unsure of blocking the mountains with my body, but I think the positioning works better than having me farther down the trail.
This is a three image panorama....10mm lens. Not much to say about that. In Ps, I had to use puppet warp a bit to bring the right lower edge back into the frame. Not anything advanced. Just set some point so that you don't warp the whole thing too much.
For editing, I upped the clarity and vibrance a bit, as well as the shadows. Not too much because I wanted to keep it very natural looking. Just enough that it compensates for the camera's inability to see the full dynamic range that the eye can see.
Question to think about, what if we could see the full range of light. No blown out suns or shadows too dark to see in....
Today I rode Curly Lake. I guess it's called. It's a mixture of different trails, but whatever. It went by Curly Lake, even though we were too busy grinding uphill to notice it. Once we got up to the top of the mountain, looked down and saw it immediately. But we didn't go back down...
On the way up to the top though, I saw this really cool little false summit and hiked up it really quickly. From the top I could see 360 around, and so of course I took a panoramic! The view was just incredible. You can pick out the three other people I rode with, way down in the saddle were stopped in for a sec.
As far as shooting, there's not much to say....it's a smart phone. Kinda self explanatory...
For editing, I also didn't do much. Raised the clarity and vibrance a bit, upped the whites a bit, and that's it. Super simple...
I guess that's all..hopefully something more exciting tomorrow!
Why mark -2? Because I think I did it better the first time!
I got a new pair of glasses the other day, some LaZer photo chromatic ones for biking. They're awesome, and work really well.
I was doing some product shots with Alex, and so I pulled out the glasses and did a quick photo of them.
One hitch though, I did use the same white background I had with the last glasses photo. Which was unfortunate because it really made the photo.
My set up was way more complex than the original set up though. I had two flashes cross lighting the glasses at 1/32 power. Pretty low for shooting at f16, but this was really just to add in some highlights and edge lights. Then I had one strobe pointed back to turn the background completely white. This is where things started to go wrong.
I was also using a soft box directly above the glasses to provide super soft light on them. Same as last time.
So problems. First, I put the backlight flash in a place where the specular highlight of it showed up in the sunglasses. Which is unfortunate. Kind of distracting and annoying. :( I should have had the strobe farther back so that it was actually behind the glasses and just lit the background.
Next problem, as I mentioned at first. The light box I was using has pretty wrinkled cloth in it, so it was very distracting in the photo. Very wrinkly and uneven. I wanted a seamless white background, and that's not really what I got. Sad face.
And further, the glasses reflected all sorts of stuff going on, so that's no good either! I'll have to figure out a way to get rid of that...not quite sure how at the moment.
Editing helping things a bit, I upped the highlights, whites and shadows to help remove some of the wrinkles in the fabric. This also made the image just look cleaner, which was the look I was going for. Not perfect though.
Think I've already used that title...but whatever. It's fitting so it stays.
Obviously, this post is about food. Why else would I title it "yum?" I went shopping today, and so I'm loaded up with all sorts of delicious food. Can't wait for breakfast, either going to be cereal, yogurt and fruit, or oatmeal and fruit. Or maybe eggs. Or maybe rice cakes and fruit and peanut butter. oh the choices.
But tonight, I wanted to try out this interesting style of lighting that combined hard light and on axis light. I read about it years ago on Stobist, but I don't think I've ever had enough lights to try it! Until now...Alex has the same lights as me, so I borrowed his and set something up.
I used raisins as my subject, mostly because I'd tried a lens and that hadn't worked at all. The shot that David Hobby got was on a cutting board and it was food, so I substituted by own food and also used a cutting board. Worked out very well.
To start, I turned on one light at a time. First was a soft box on one corner at 1/16 power. That is underexposed for shooting at f16, but I'll explain that later. With a lot of lights, there's a lot of light.
Next I turned on two hard lights. One opposite the soft box, and one in between on the other other corner. These were both to 1/128 power and mainly just to add some highlighting on the raisins.
Once I got that all set up, I brought in my ring light. I shot straight down with the 50mm, with the ring on axis. So I shot through the ring light, in other words. After a few tests, I figured out that the ring needed to be at 1/2 power to be bright enough. So really freaking bright. Even though the ring eats up 2 stops of light.
In hind sight, I think a lot of the light from the other strobes was being overpowered by the ring light. Maybe not entirely though, so it definitely helped add some contrast and texture to stufffff.
The ring lights purpose was to fill in the shadows. As in, all the shadows. That's what ring lights do, they fill in shadows when you use them on axis. The make beautiful light, especially when you use some hard light with the to add back some contrast to texture.
For editing, I started with upped the shadows even a little more and upped the clarity just a hair. Next, I added a elliptical adjustment to brighten the raisins and create a bit of vignette. To wrap everything up, I add some blue to the shadows and golden tones to the highlights. Just to add that little touch that I like.
In the end, it's what makes life interesting, right? Playing around, messing with stuff and seeing what happens. I know I've said it a thousand times, but that's one of the best things about photography. Having to ability to recreate the world around you in all these crazy ways, just by using a camera! Mess with some settings and everything goes insane.
Tonight I had a picture all set and ready to go, but there was something about it I really didn't like. I'd done it really fast and wasn't too happy with it. So I wanted to do something different. Completely different.
On the 50mm went, all the way to f1.4, and out to the porch I went! No idea what was going to happen when I got there, but that's okay!
As I stood there, watching the cars go by.... well you can probably guess the rest.
If you can't, I'll give you a hint... my shutter speed was 3.5 seconds and the pan lock was open on the tripod.
What do bright lights make when they move through an image? What do cars have that are bright? Do cars move? Can the camera also move? What happens when you move the camera and the car moves?? Let's find out!!
So I sat there for a couple minutes just taking picture after picture of cars going past. I panned the camera to follow the car and just had no idea what I was going to come up with. So fun :)
Out of the pictures, some unexpected happened. I got a few with cars frozen. Not completely, but reasonably so. I just my panning skills are pretty good, because that's the only way I could see over a 3.5 second exposure of the car moving that you can get a frozen car. Looks cool though!
I love the light trails going everywhere. Both uniform and the very organic lights. You can see where the car was pointed at the camera, and where the headlights went out of the frame because the car was then parallel to the camera.
You can see the photo though, so I'll stop talking.
For editing, I upped the clarity a bunch and the vibrance. Then I added a very slight cooling of the lower half of the image by way of a gradient adjustment filter. I just really don't like that evil orange glow from street lights.
Anyone that rides knows what I mean. The little sharp things you put your feets on. I got some shiny new ones today, and I haven't done many product photos lately, so why not tonight?
I dragged out my light box (my sisters old one because I got her a new one for her birthday), and stuck the pedals in it. I wanted to use the ring light since I haven't used it in a while, and it's a fun toy. So I stuck a strobe in to light the inside a lot, then shot straight down with the ring light as a center key/fill. Since it's such a large light area, the shadows were really filled in a looked lovely.
I shot at 1/125, f3.5 and ISO100. The strobes were at 1/16 each I think, and very close to the pedals. The ring light takes about 2 stops of light, so I had to be pretty high in power for it.
Here's a quick photo of the set up so I'll make more sense. I had the camera just to the right of the ring light. The lens was actually touching the light.
As far as positioning the pedals.... I wanted the DMR logo and the Vault to both show, so I simply stacked them in such a way that was happening. Nothing to it :) Angles are nice, so they are both off tilt a bit and form lots of pretty shapes.
Dust. Once I got a good photo, I realized the pedals were covered with dust. Like covered. It was bad. So I cleaned them off and re did the photo. The resulting image was so much more clean than before. ;)
In editing, I raised the highlights and whites a lot, as well as the contrast. This just got the whites very white, and the blacks nice and inky. I raised the saturation of blues for the pins, and then dropped the yellows, oranges, and reds to get rid of those colors. Just helped clean up the photo a bit and remove distractions.
This weekend, I went on a little trip to the CDT trail near Dell, MT. I don't actually really know where we were, but it was somewhere near the Italian Peaks! The goal of the trip was to get some work done on the CDT (continental divide trail), but the weather had different plans for us. The first night was filled with thunder, lighting, and lots and lots of rain. Same story with the next day and night. The first work day was pretty much just a hike through 3 inches of mud to the work sites, then scraping mud around or cutting soggy branches hanging over the trail. There was some work to do, but not as much as we'd hoped for. And everyone was soggy from hiking in the rain all day. Some work got done though, and everyone had a great time despite the shittyness unfortunate nature of the weather for the day.
Plus there were epic burritos for dinner, which helped a lot.
The next day I was sick in camp all day, but what I've been told is the rest of the group just hiked all day and found about as much work as the day before. The rain in combo with cows, cows, and cows ruined the trail surface, so not much work could be done in those sections, and there weren't all that many drain dips/trees to work on. It sounded like everyone got a good hike in though, so that's a plus! And another epic dinner happened that night in the form of quinoa salad.
Last day was mostly spent traveling, so nothing to report there.
Despite the weather, sickness, and not being able to help on the second day of work, it was still a very awesome trip. I mean the food was great, so what more can you ask for? ;) No seriously, it was a great way to spend a weekend with awesome people.
Of course I brought my camera, and I've got quite the collection of photos and even a little video to share! It's taken me about 4 hours of editing non-stop, and that's a pretty long time to edit for me. Editing every day for almost a year now, I'm pretty fast, and I've had to pull out almost every trick I know tonight to keep things going smoothly. There were about 500 pictures to first sort in picture to edit, pictures to turn into a time-lapse, and then later which pictures from the time lapse to turn into singles and then a collage. A lot was going on in my head. Batching bracketed photos at the same time as editing panoramas, as the same time as batching settings for the time-lapse is like three things at once! Gotta love task switching. Much entertaining to try to keep track of everything. I'll stop things there and just drive into the three photos for the blog, and then I'll give a little lead in into the rest of goodies for tonight.
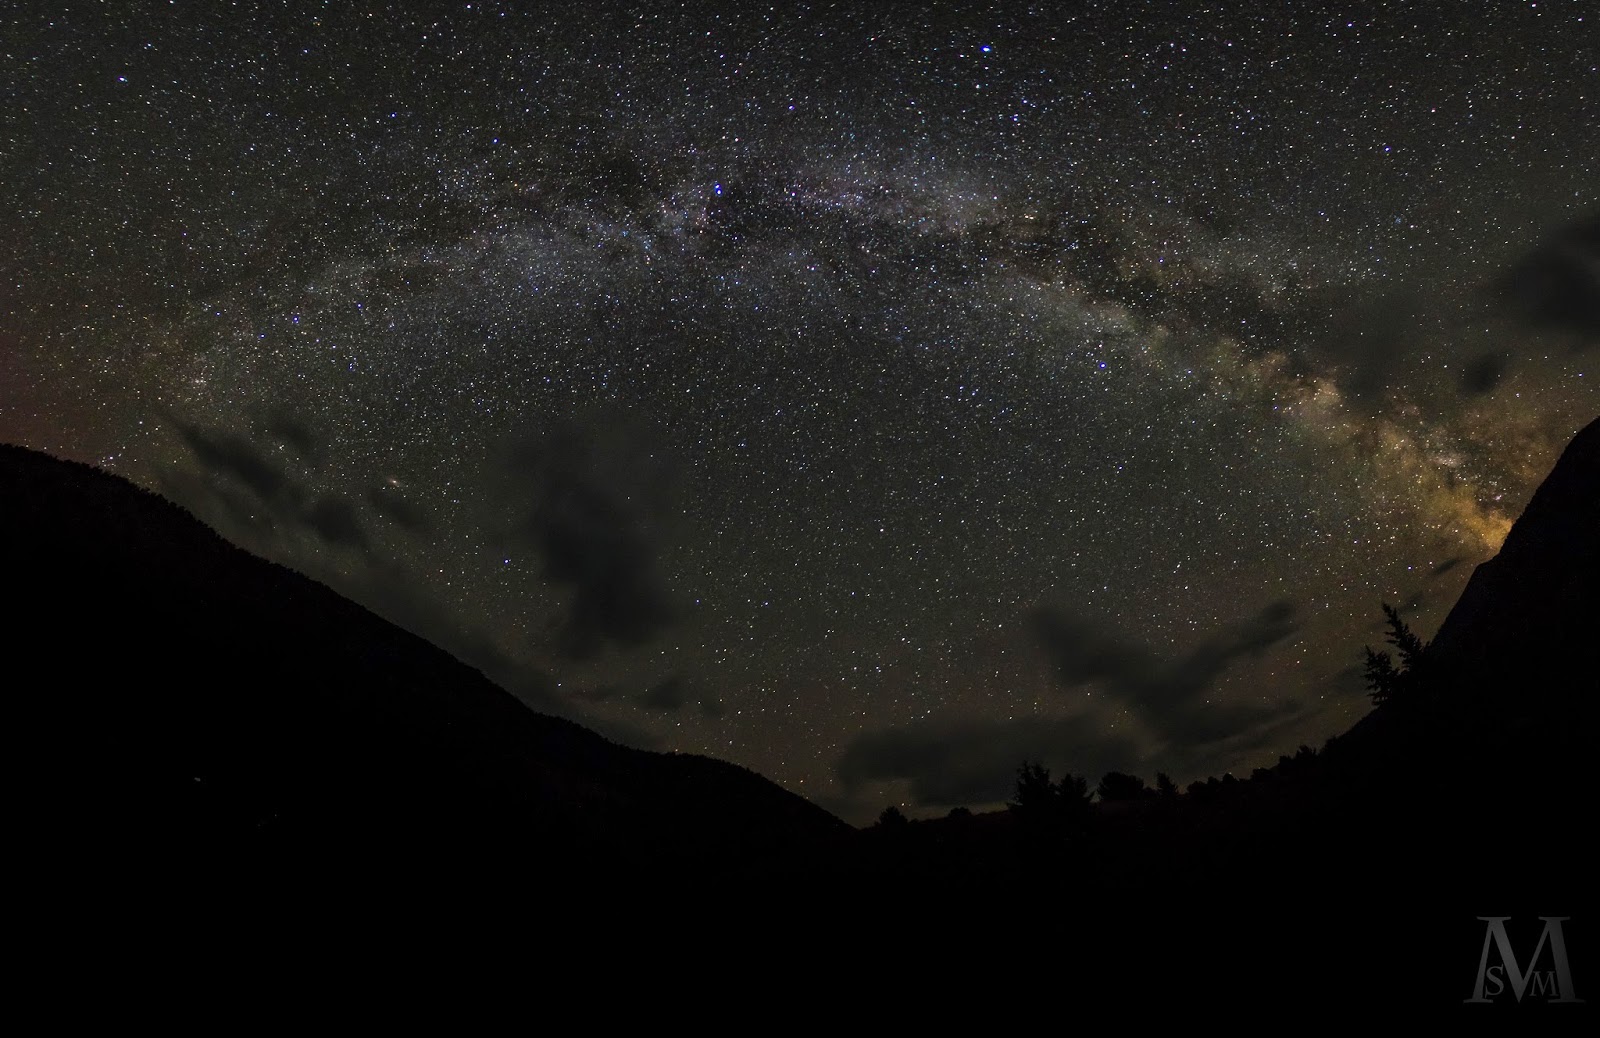
So first night was semi clear, and the stars were awesome. One of the group left a light on in his tent, and I grabbed my camera for a long expo of the scene. There was a stand of trees behind the hill the tent was on, so I faces sort of at an angle to them so that the tent fell on the lower left third intersection ( rule of thirds if you don't know ) and then the stars would be in the upper right. All about balance people. The shutter was open for 714 seconds (no idea what that is in minutes) at f2.8 and ISO800. Got a wonderful exposure from that. The stars really started to do the spiny thing as I facing due north (is that how you spell it?), and the whole composition became very spherical. The 10mm fisheye I was using really distorted the edges so it looked like the whole photo was circular. Even the hill on the right side and trees were at the right angle to support the composition I was going for. Wonderful.
For editing, I upped the clarity and vibrance. Also cooled down the temp a bit. Not too crazy of an edit really.
Little noisy, but that's okay.
So the next day's pictures might be one of my favorites all year. And I wasn't really even trying! Funny how that works.
After everyone got back to camp and ate, we made a wonderful fire and talked for hours. The whole time I had the camera running a time lapse. One picture a minute, set to Av at f3.5 ISO200. So set up was super easy and I didn't think but about it. I framed the group and fire on the lower right third, put a tree in the upper left, and then put some sky in top and ground filling most of the lower third. All this to keep the balance nice.
In Lr, I did the following. Clarity and vibrance up a lot, highlights down, shadows and whites up. This gave the photo an HDR look, and really brought out a lot of detail. It made the stars and fire really pop out. There's a lot I love about this picture, and I sure just by looking at it you can figure out what those things are.
So on to the final one.
I've said so many times it's worth it to see the sunrise. You should believe me. The sunset is pretty, but you can see the sunset every day. The sunrise is more difficult to see because you have to actually get up when it's dark out! In the summer that is, in the winter it's not too hard but then again you're probably in a classroom when it comes up so.....I digress.
I was up early this morning, and took a panoramic of the sun rise on the hills in the distance. There was this magical purple glow going on, and the rolling hills were just amazing. I simply shot in Av again at f16 and ISO400 to get a fast enough shutter to not get blur since I was at 135mm.
Pano'd it in Ps, then in Lr I upped the clarity, shadows, and vibrance a bit. I also toned everything a bit more purple to match what I saw. I love how it turned out. Not the most dramatic photo ever in the style I usually do, but it something I haven't done much of.
As for the rest of the photos, as usual, ask if you want to know more about one!